OKAY Synth
Hey! Check this out
Oskitone OKAY from oskitone on Vimeo.
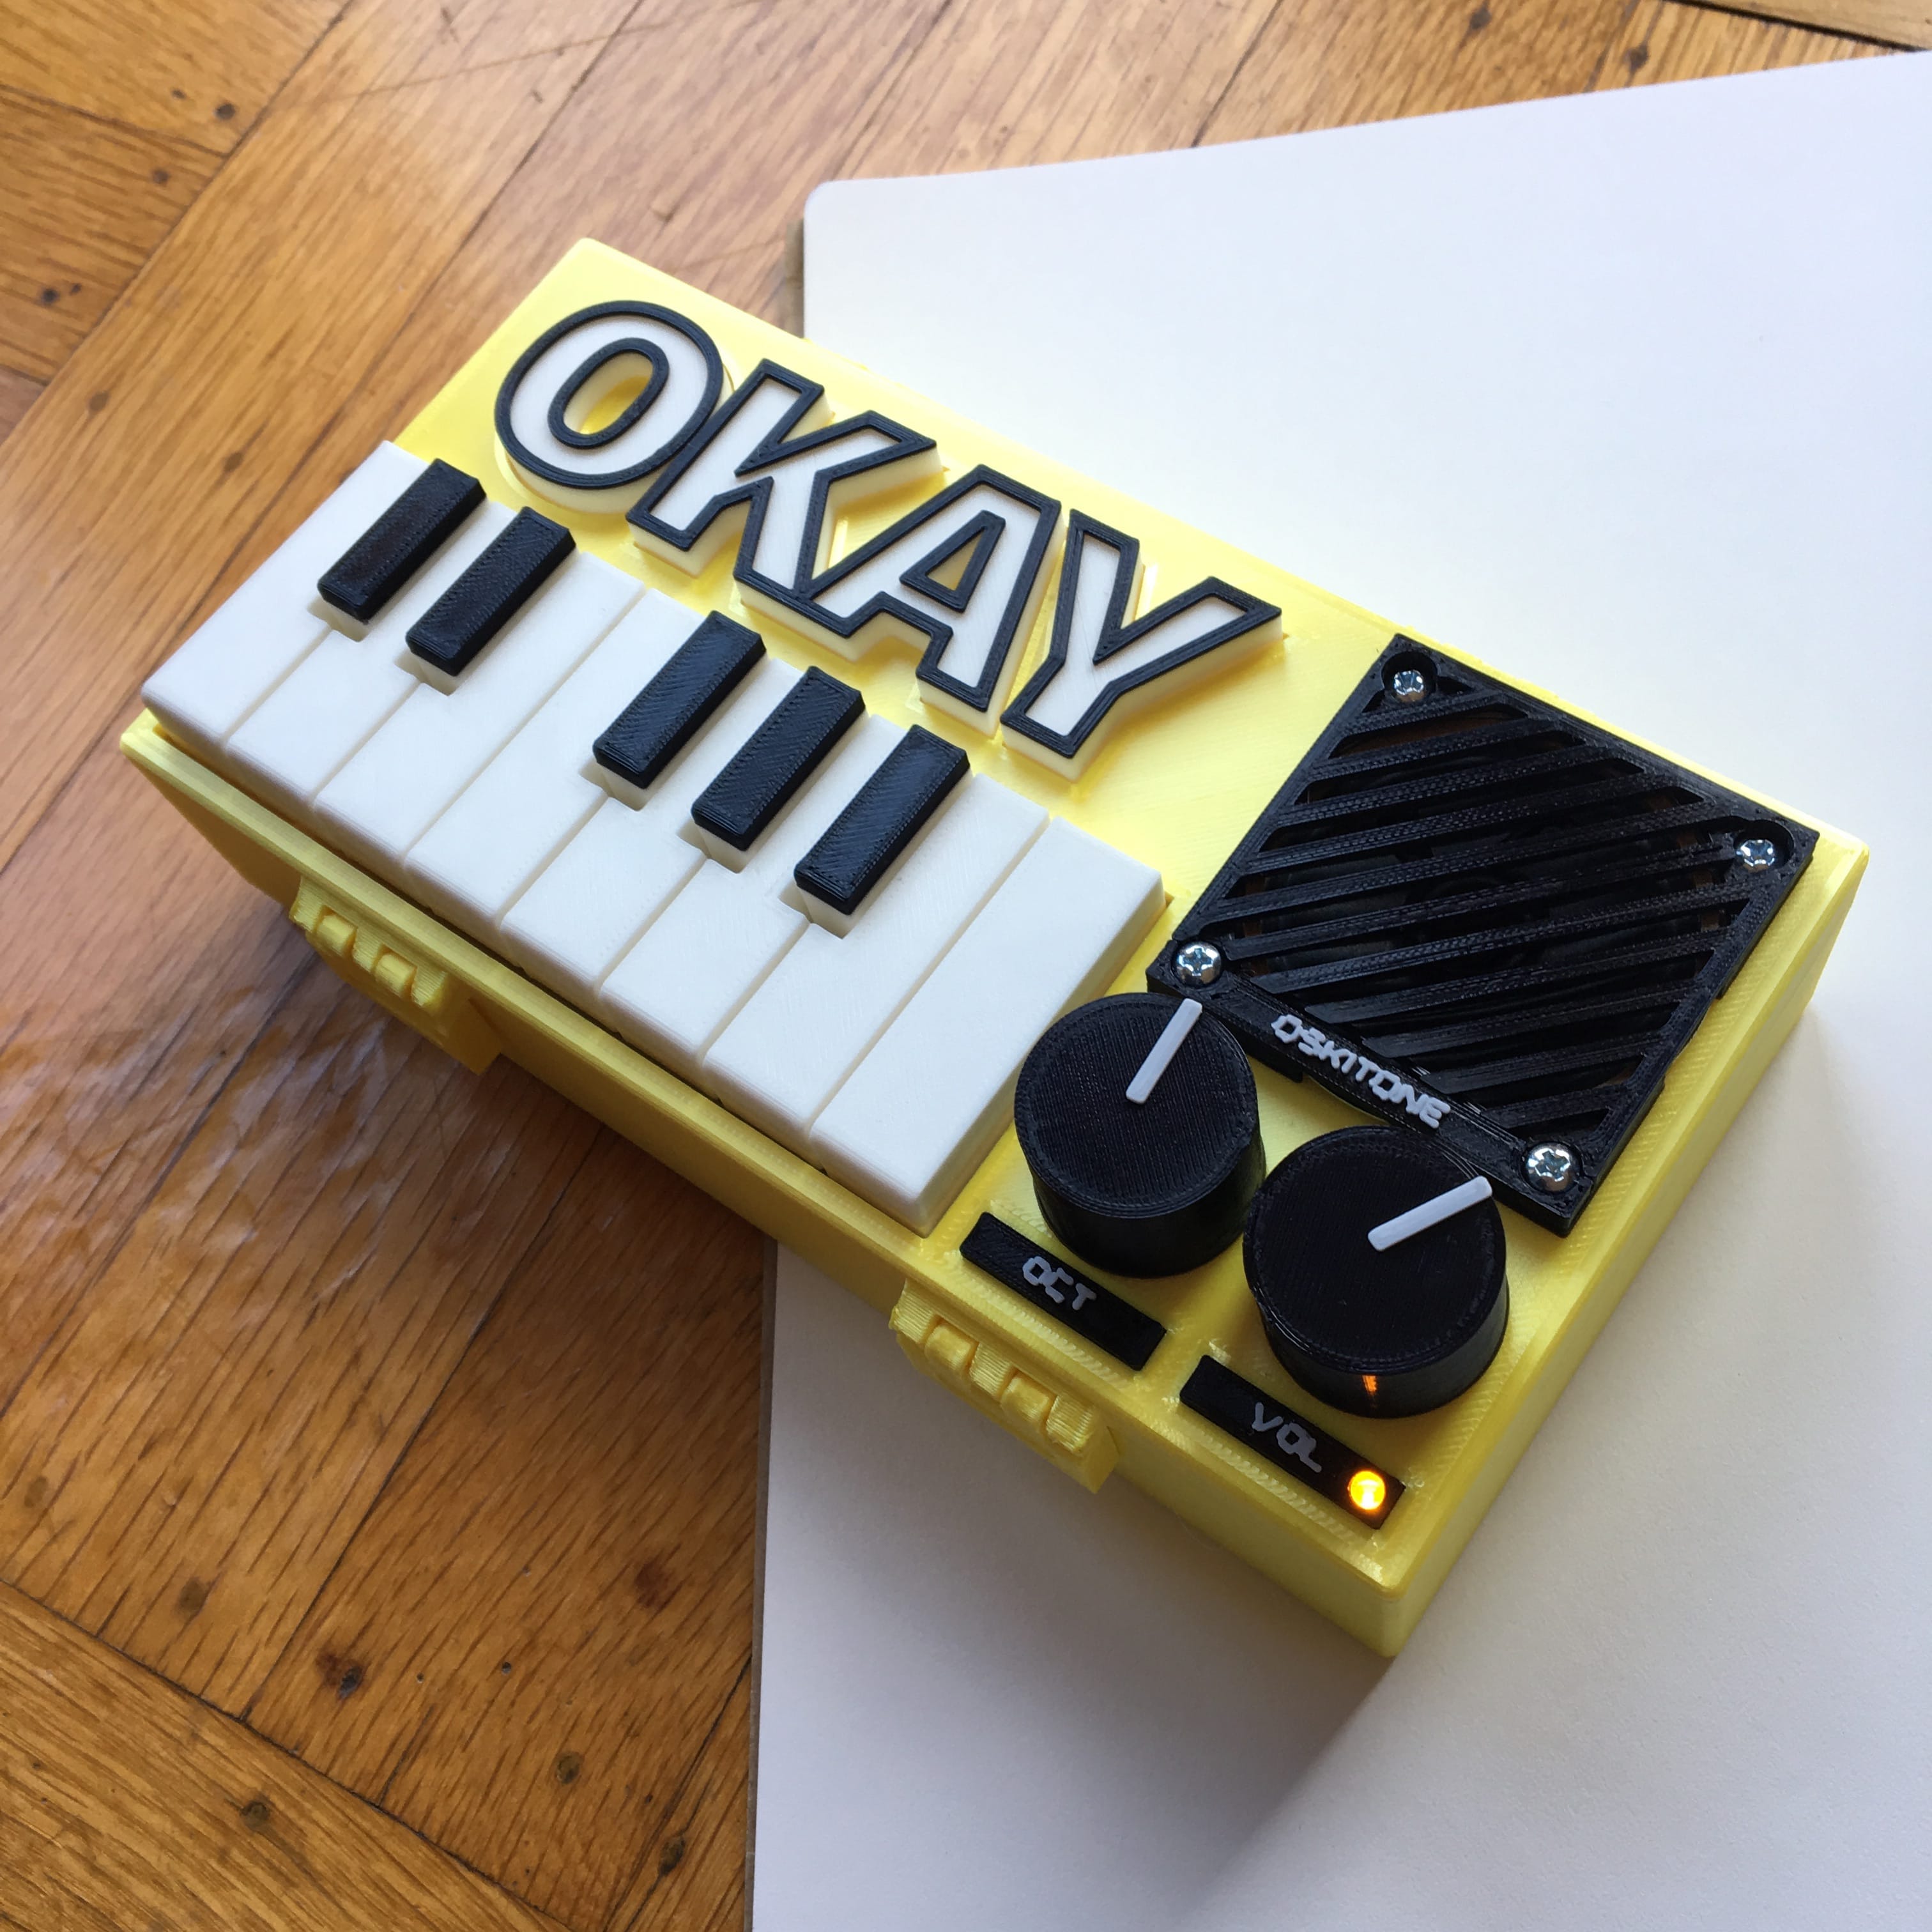
It's a monophonic, analog, square-wave synthesizer, and I'm calling it... OKAY!
- Monophonic:
Only one note at a time can be played. This is opposed to “polyphonic,” where multiple simultaneous notes can be played. - Analog:
There are no computers, microcontrollers, sound samplers, or anything digital involved. The sound you hear is the sound of a speaker being abused by discrete electronic components like capacitors and resistors and logic chips. - Square-wave:
When its output is viewed on an oscilloscope, its wave resembles a square. It’s a “hard” sounding wave type, great for bass lines, and commonly associated with chiptune music and old video games.
With a name like "OKAY" you might guess that functionality is intentionally limited. There’s just one octave of keys, a volume/power control, and an octave rotary switch to select from six different octaves. But what the OKAY lacks in features, it makes up for in accessibility; it uses standard, off-the-shelf electrical components and can be put together in about an afternoon.
How it's made
3D Printed
Unlike the F0 which had a store-bought box, the OKAY is entirely 3D-printed beyond its electronics. The enclosure, keys, speaker grill, and everything else were all designed in OpenSCAD and lovingly printed on a Prusa i3 MK2.
The 3D models are available on Thingiverse and MyMiniFactory.
Electronics
Under the hood, it’s powered by an LM555 timer (astable mutlivabratory), CD4040 ripple-carry binary counter/divider (frequency divider), and an LM386 power amplifier. All are the standard circuits you'll see diagramed in their datasheets.
The 555 timer chip is the heart of the OKAY and was chosen for its ubiquity. It’s well documented, well loved, and has been around forever. It’s so omnipresent that it’s hard to talk about any kind of timer circuit without somebody saying “Just use a 555!”
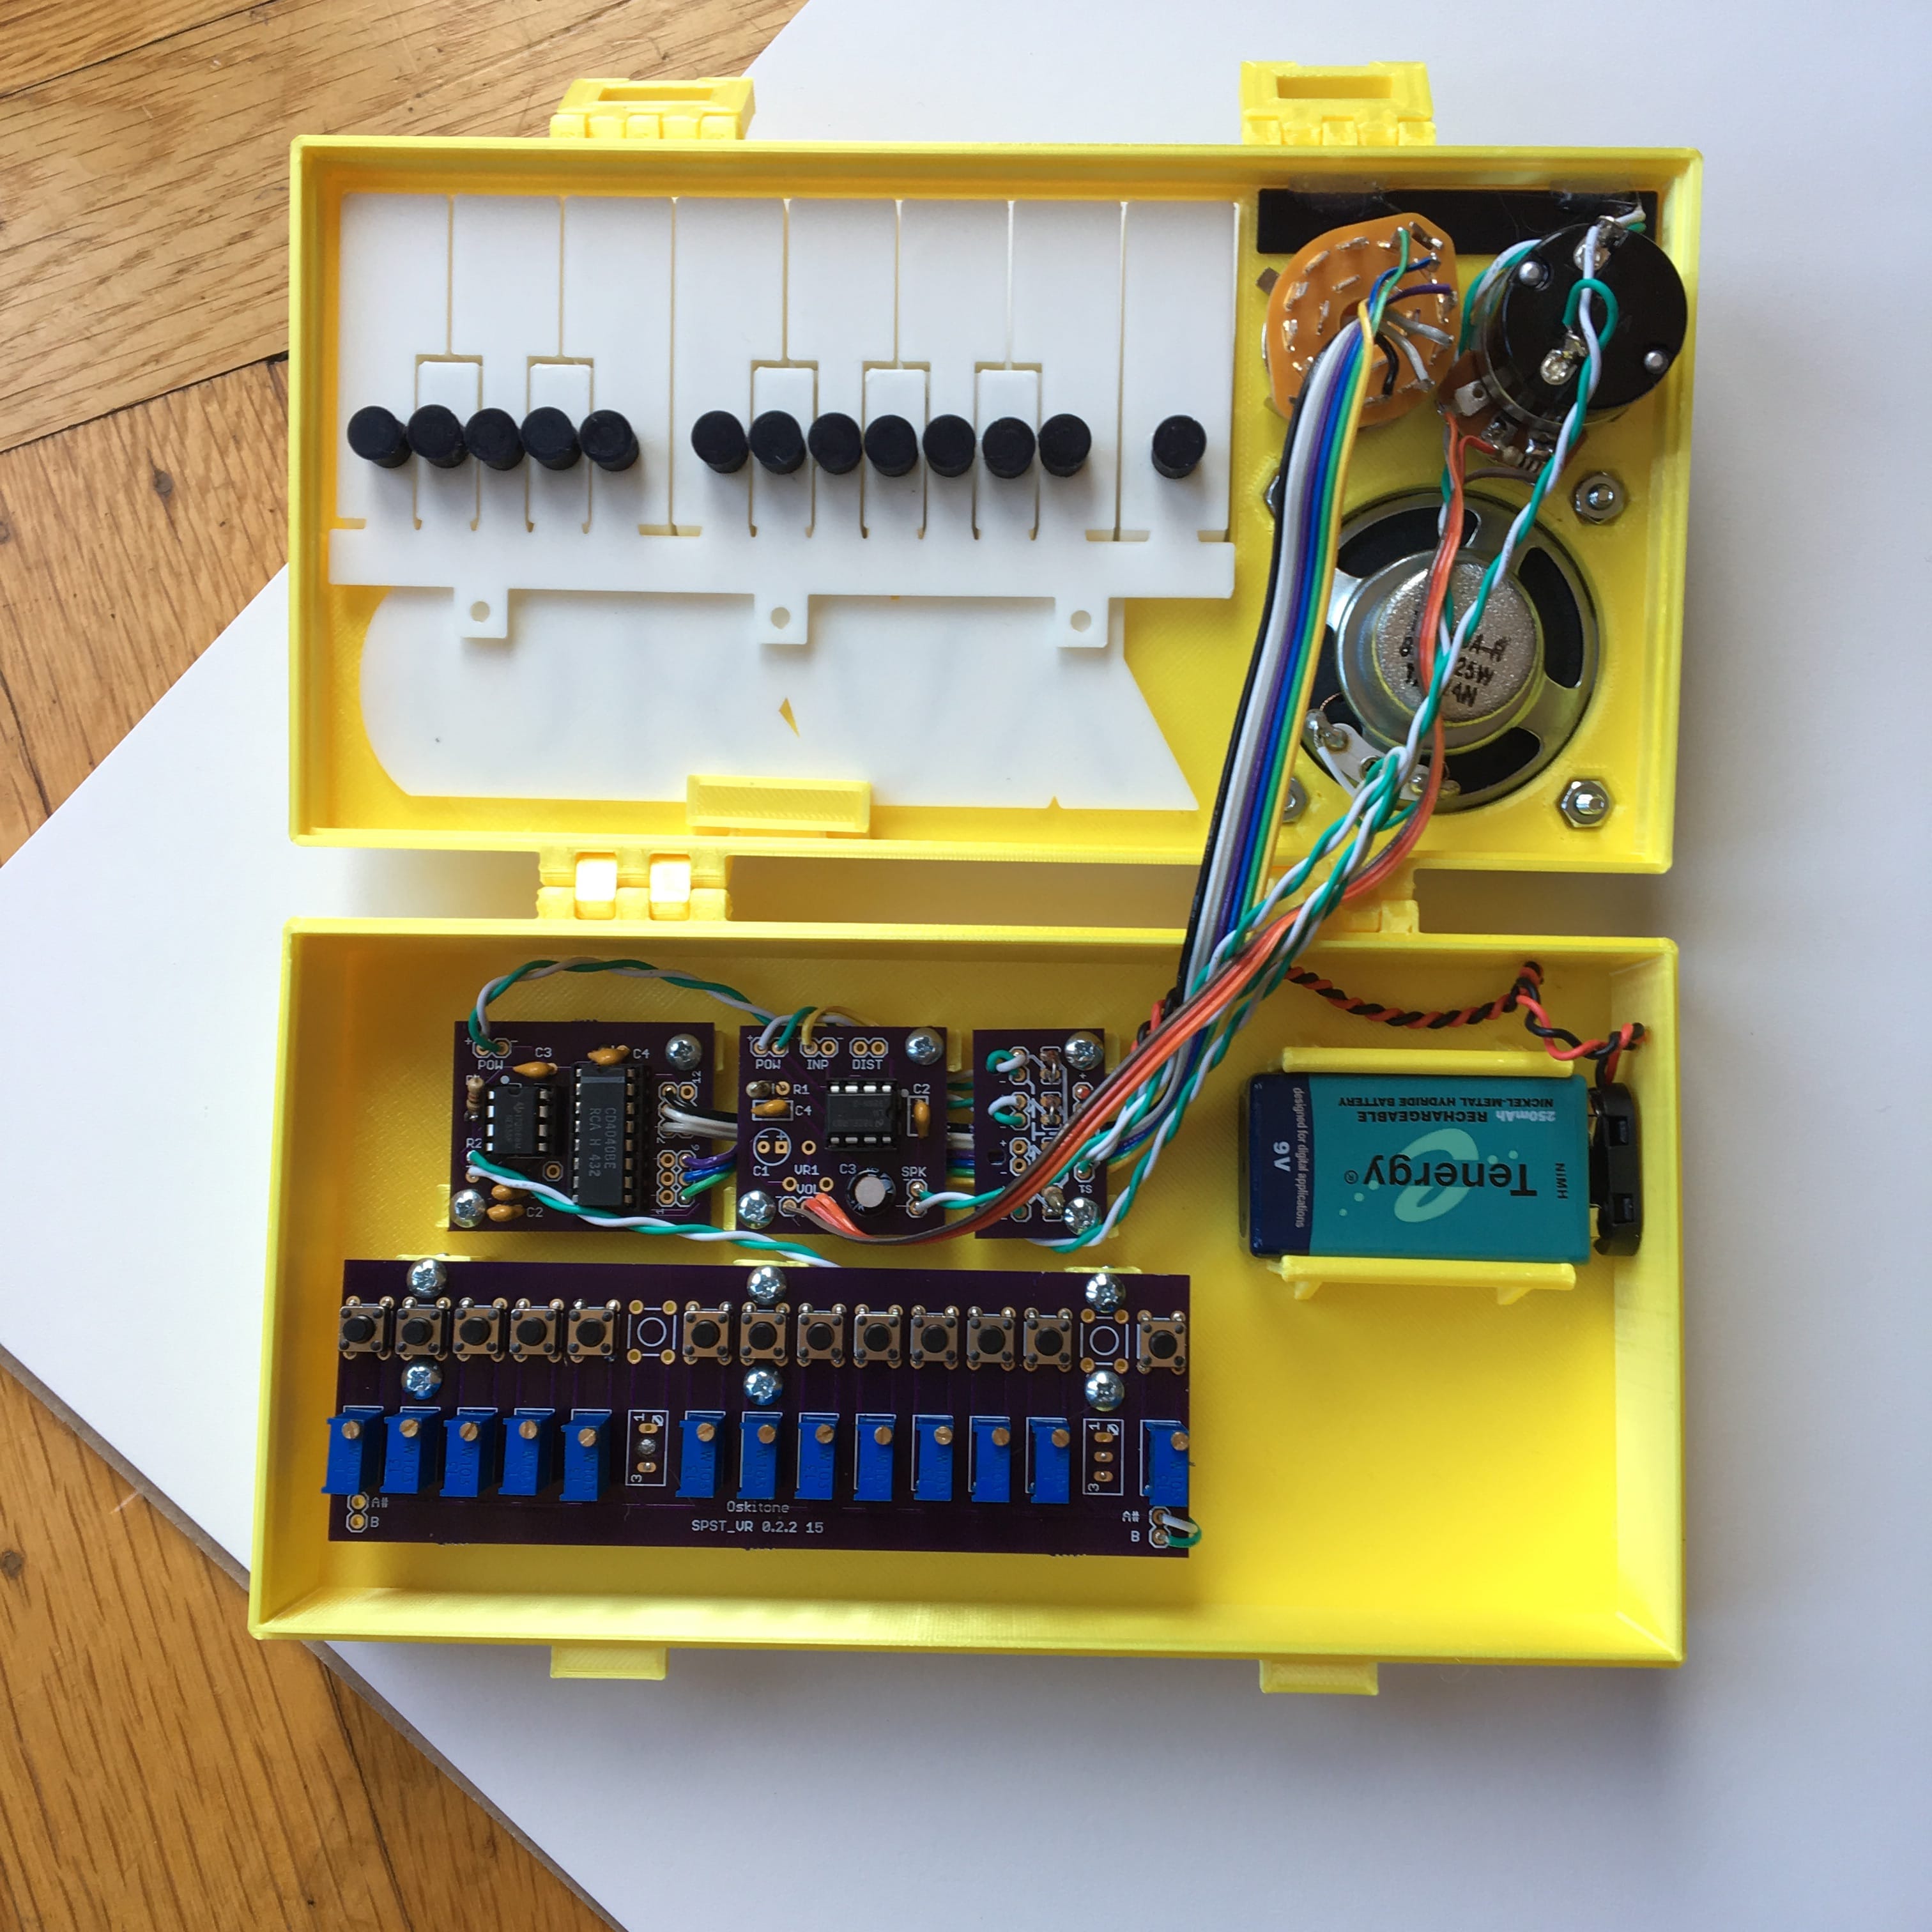
Modular PCBs
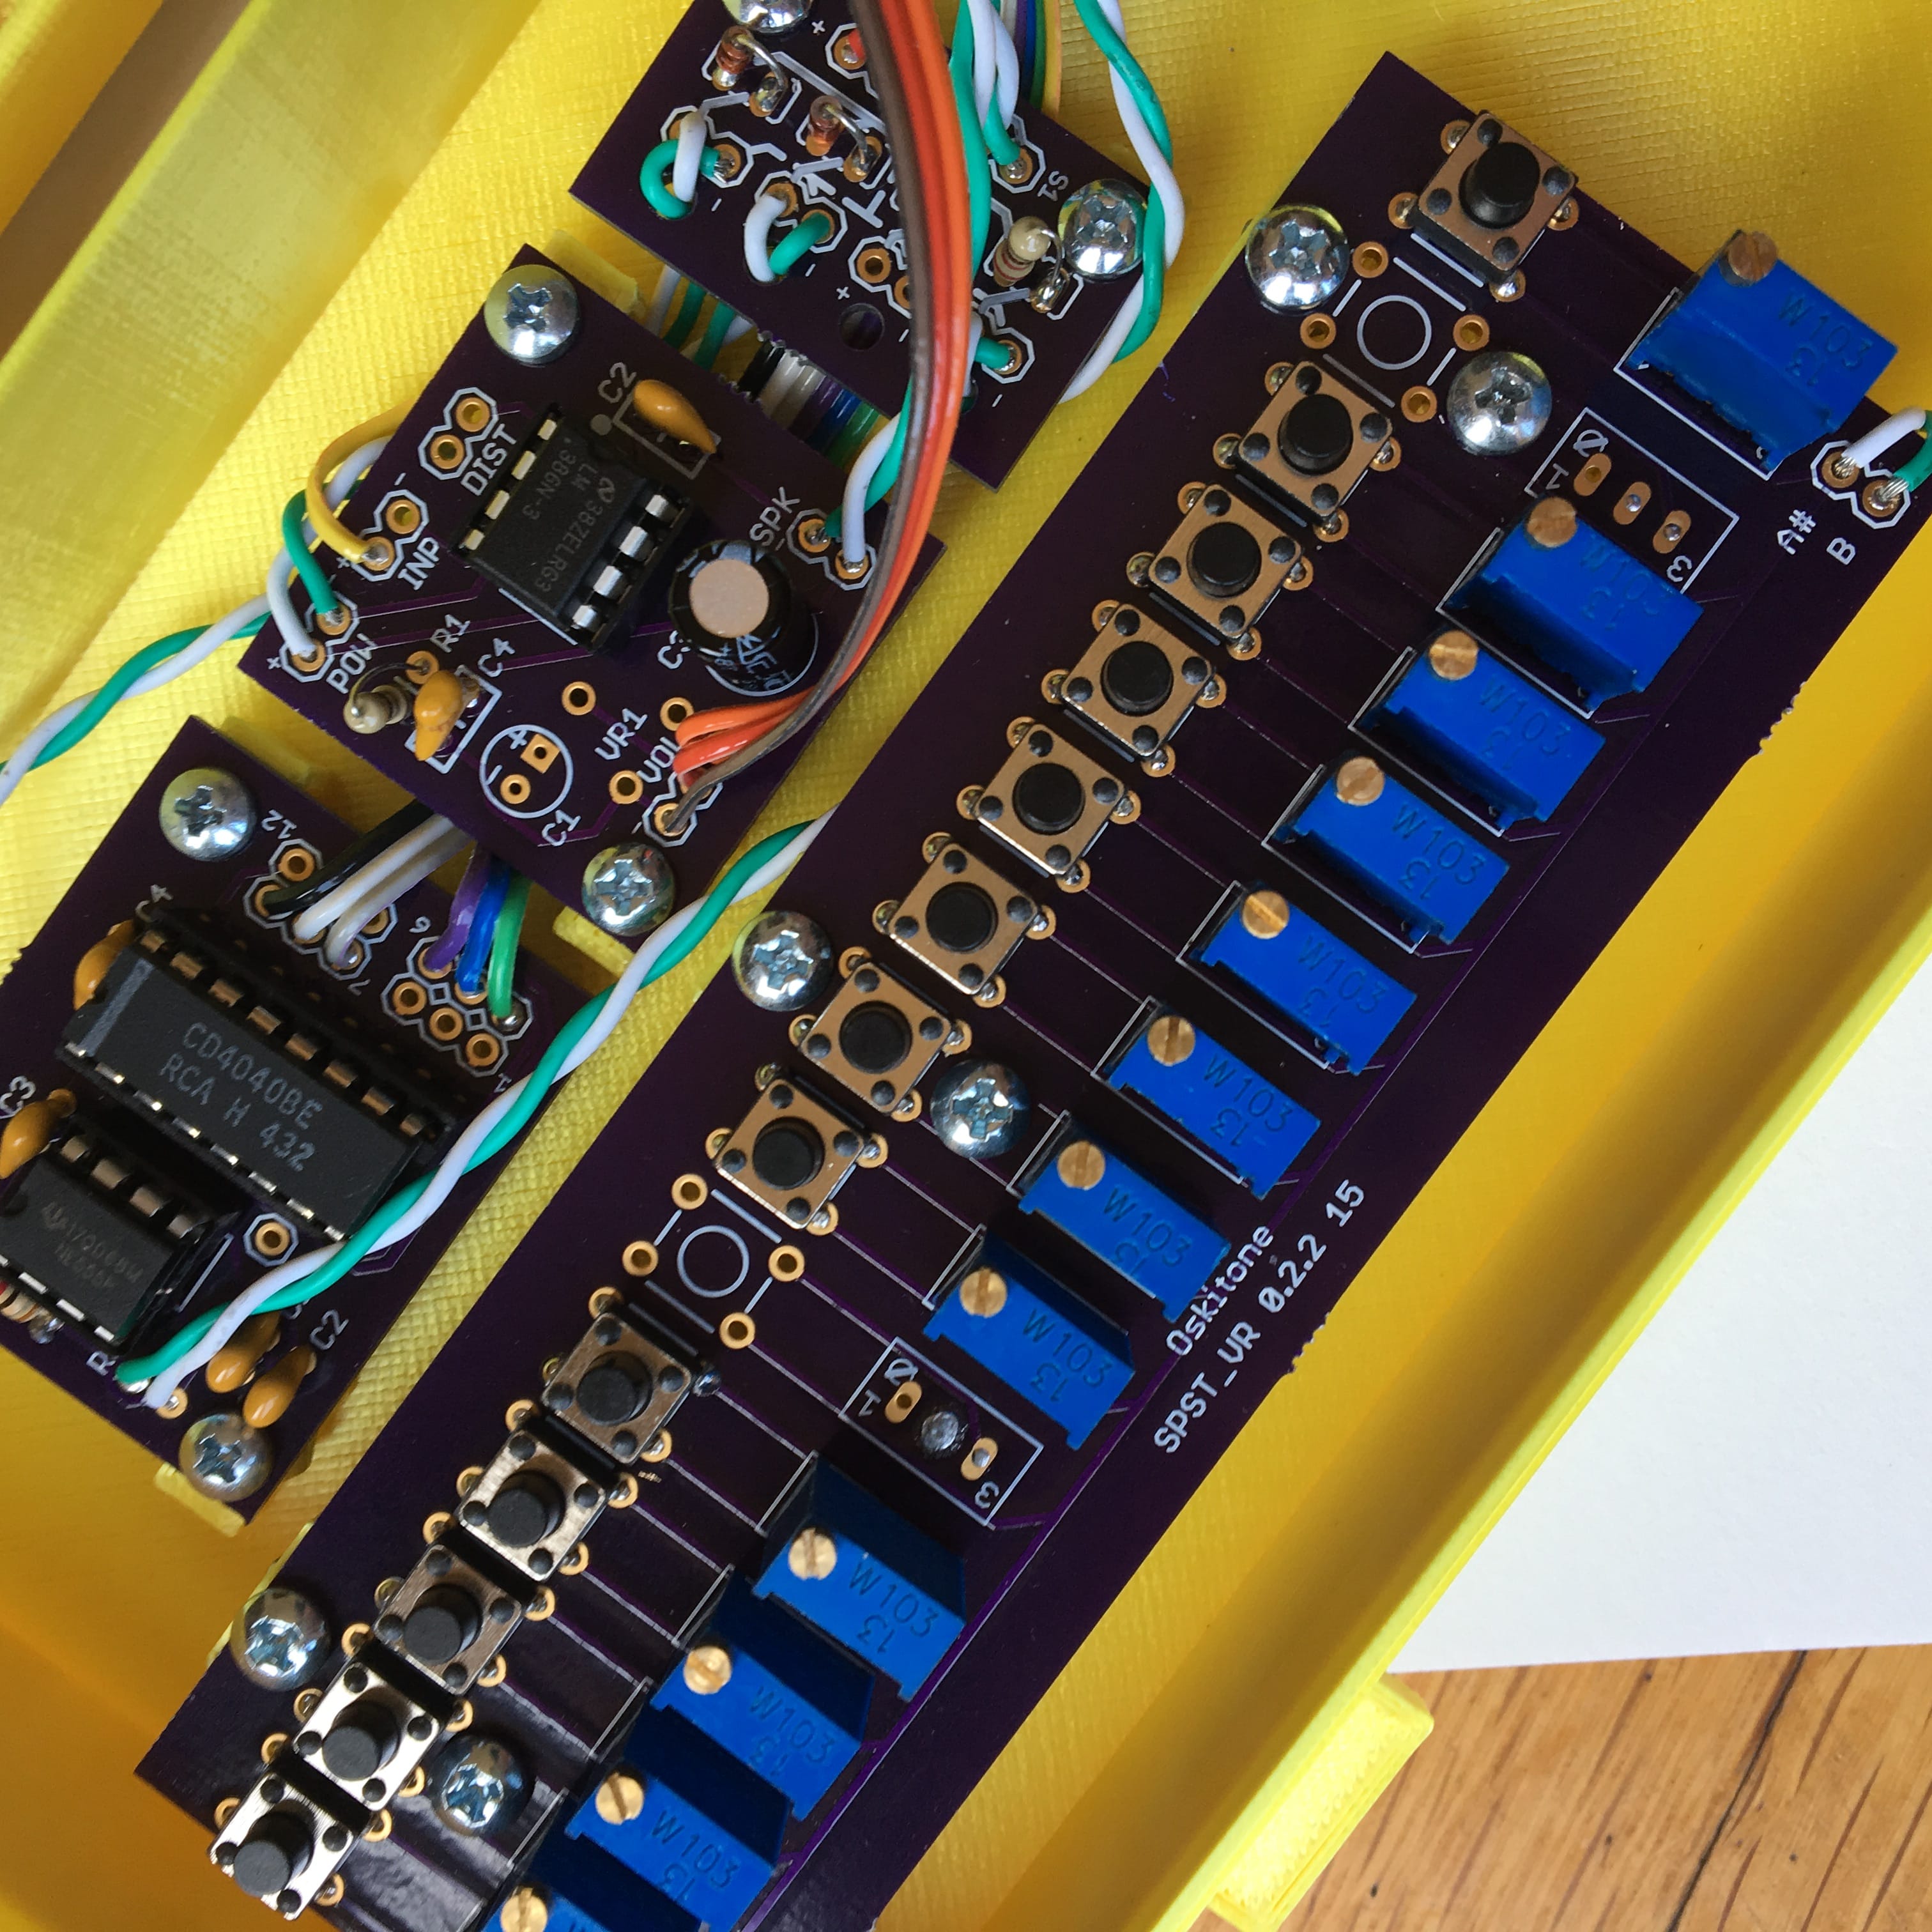
The OKAY employs a modular approach to its PCBs. Instead of one monolithic board, the instrument’s tasks are split into four smaller boards, each with their own responsibility. (I’ve used this approach in my other instruments too: F0, Chord Synth, POLY1.)
- Power bus (bus 0.1.1)
Switches and distributes power from the 9v battery to the other boards and LED - Timer and divider (555_4040 0.1.1)
Oscillator and frequency divider, provides 12 octave output - Keybed (SPST_VR 0.2.2 15)
Trimming potentiometers and pushbuttons set the 555's frequency - Amp (386 0.1.1)
Standard headphone amplifier circuit
What that modularity loses us in assembly speed it gains us in clarity, extension, reuse, and hacking.
- It’s obvious what each chip is doing, with clear input and output across the boards.
- Adding another octave of keys, amplifier + speaker, octave changer, or some other effect will just be adding a new PCB into the pipeline and altering the 3D model to fit. That kind of customization would be impossible if everything were on one PCB.
- All of the boards can be repurposed for other roles like standalone amps, metronomes, and other noise machines
- All boards also expose the full functionality of their circuit instead of just what’s required for the OKAY. The amp, for example, has pads to make it distort; the oscillator outputs 12 octaves even though you’ll only use 6. If you're making your own OKAY, you can hack it to do whatever you want.
Development
The OKAY isn't just its electronics. I put a lot of thought into its design:
- Made to be opened
Why pour your heart into something just to hide it away? The enclosure has beefy hinges and buckle clasps that are designed to stand heavy use. Once it's opened, the electronics are displayed with pride. - Gratuitous color-changes
I don’t have a 3D printer that can print in multiple colors, but I was able to get multiple colors on the keys, OKAY text, speaker, knobs, and control labels by carefully changing the filament at defined places. - Dovetail joints, but maybe not where you’d expect
I tried various key mounting strategies, like fixing them directly above the keybed PCB or screwing into threaded inserts, but I ended up mounting them to the enclosure's top with a dovetail joint. A similar dovetailed tab holds the OKAY text in place. This minimizes gluing and speeds assembly. - Screwed-in PCBs
Early versions of the OKAY tried to glue or snap the PCBs into place, but they’d quickly come undone when I wanted to run wires under them. My solution was to hollow a nut locking cavity into each of the PCB posts and screw the PCBs into place. - Key cantilever redesign
The keys are basically the same as the ones I used for the F0, but I rewrote their cantilevers (the springy part between where it’s fixed to the enclosure and where you press down) to make them feel more stable and have a consistent resistance - Peg key plungers
The keybed PCB's trim potentiometers are taller than its pushbuttons, so the keys can't lay directly on top like they could with the F0. Instead, "plungers" (the black cylinders you see in the photos above) descend from the keys and make up for the height difference. They're held in place by snap-in pegs . - Custom knobs
Even though the two control knobs look the same, they’re individually fitted to their components; one fits a knurled shaft rotary switch and the other uses a tension screw on a shorter shaft potentiometer. Both mimic guitar knobs and hide their component's mounting hardware with a recessed cavity on the bottom - Speaker mounting grill
To keep the enclosure as small as possible, the speaker is actually mounted to the outside and held in place by its grill. Under the enclosure’s top, the nuts are locked in place by hex cavities, which reduced the required length of the screw and allowed me to use the same size throughout the whole kit. - Battery holder
Early iterations taped the battery in place, but, by substituting for a shallower speaker, I was able to make room for a dedicated snap-in holder for the 9v battery.
Get it now!
You can purchase the OKAY right now at oskitone.com. It comes in three flavors:
- Fully assembled
Ready to go! Lovingly put together and tuned by yours truly. - DIY Kit, Complete Edition
With all electronics components, enclosure, keys, and manual included. - DIY Kit, BYOP Edition
Only the electronics components.
What’s next?

I hope folks like the OKAY, because there's plenty more planned:
- More keys please
Oh, this will happen! The SPST_VR PCB has mirrored output headers for daisy-chaining, and it can be trimmed to make arbitrary key counts. - Polyphony
I'm no stranger to making polyphonic instruments and the OKAY won't be immune. I've made some progress on a 6*556 12 oscillator PCB, but the board itself is big enough to require a completely different enclosure design. Expect the polyphonic to be the OKAY's older sibling! - Different colors?
The new ones are in yellow, and I've got a couple older models in blue and black. Contact me if you want to buy one in a different color. Of course, if you print it yourself, you can make it any color you like. - Different wave types
This is easier said than done without greatly increasing the complexity and number of circuits, but I do have something planned. Stay tuned. - Effects
Remember how the PCBs are modular? That will make it easy (well, not prohibitively difficult) to add effects like high-pass or low-pass filters, portamento pitch gliding, octave doubling, etc, without completely remaking the entire instrument - Different text
I don't have a way to automate this yet, but, just like the having a different color, it's of course very possible. If you're interested in getting an OKAY with different text (most 3-5 character words work just fine), contact me and we'll work it out.
Follow along via Instagram, Twitter, or email to learn when the OKAY updates. As a token of gratitude, please enjoy a video of two early model OKAYs having a duet: