Oskitone Makes an Atari Punk Console
A decapitated robot head? An extraterrestrial communicator? A specter summoner?
Nope (and yep!), it's an APC!
Just like the other Oskitone projects, it's a 3D-printed electronic musical ~instrument, designed in Kicad and and OpenSCAD, Open-Source, and just plain ol' annoying fun.
Here it is in action:
As usual, this blog post details all the nooks and crannies that can't fit on the store's product page!
Byproducts
Byproducts are secondary, unintended goods from the production of some primary good. You know a couple already:
- Bran from flour, molasses from sugar
- Gasoline and plastic shopping bags from oil
- Leather, gelatin, and lots of surprising stuff from meat
- Duraflame logs from pencils
And the APC is kind of a byproduct of the POLY555!
How PCBs are priced
When you send a Printed Circuit Boards (PCB) design off to a manufacturer, you're billed by the square inch of the smallest rectangle it can fit on. A 4" circle is priced as a 4"x4" square, etc.
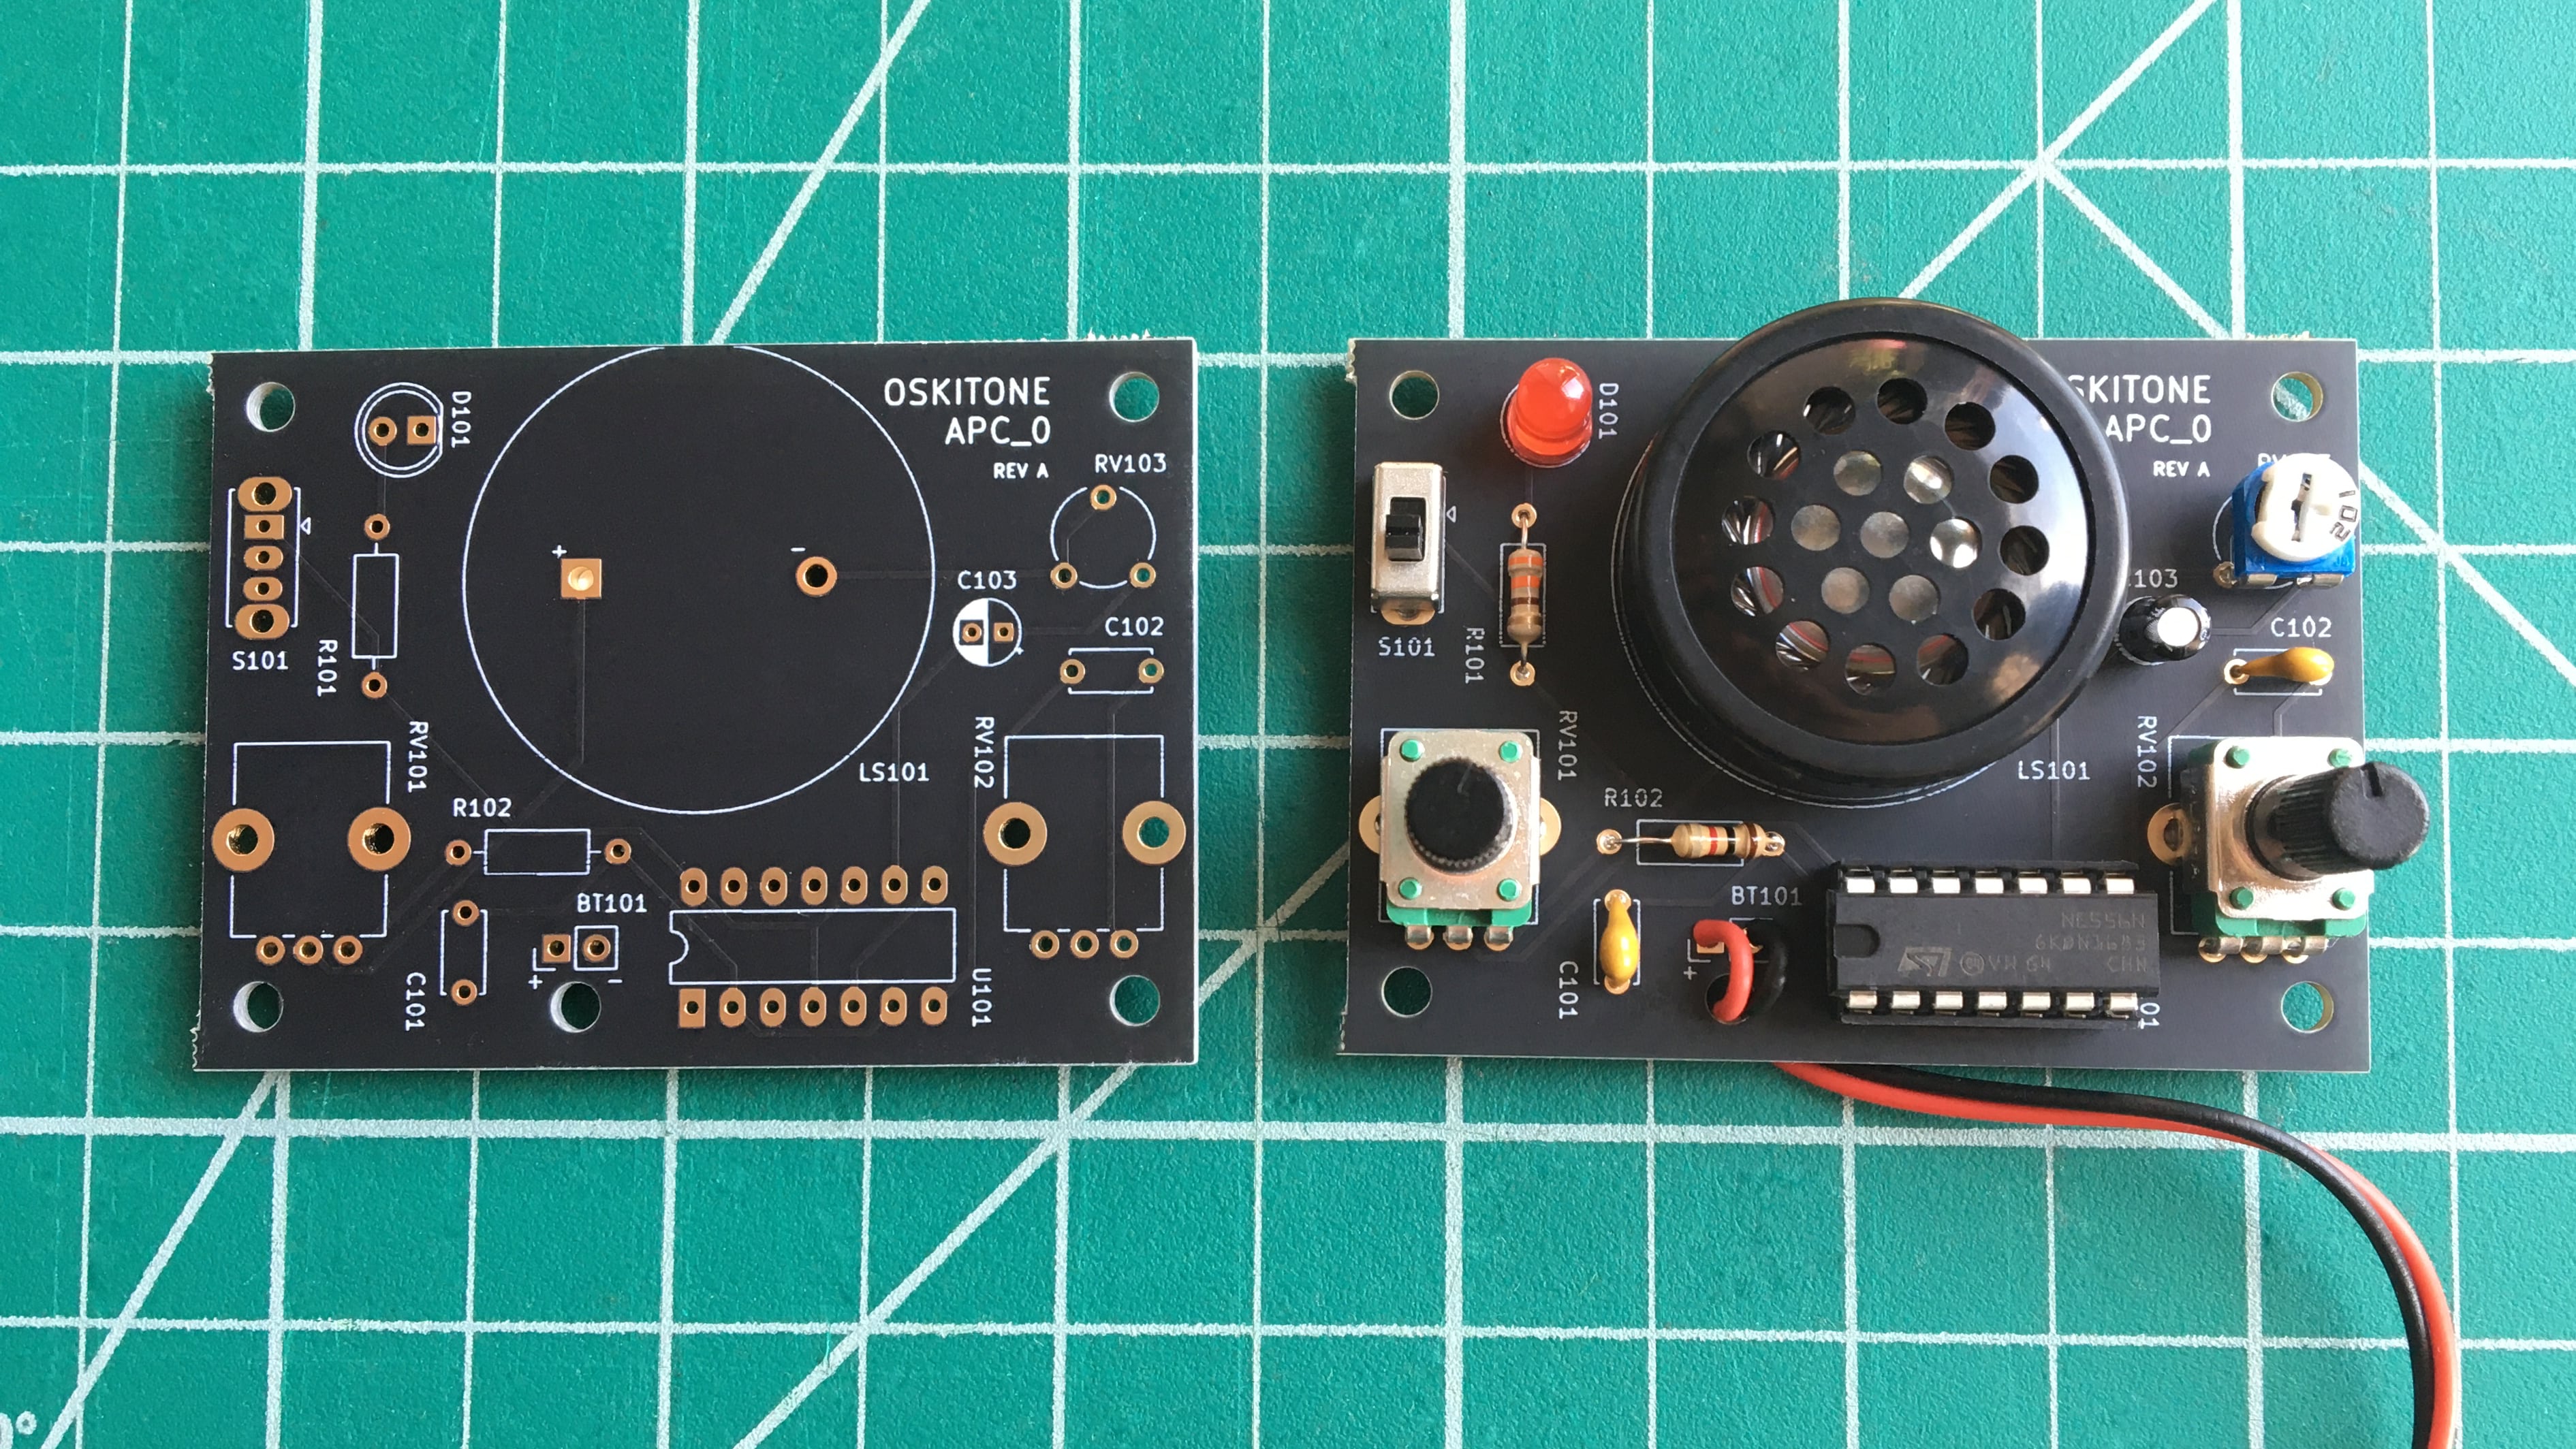
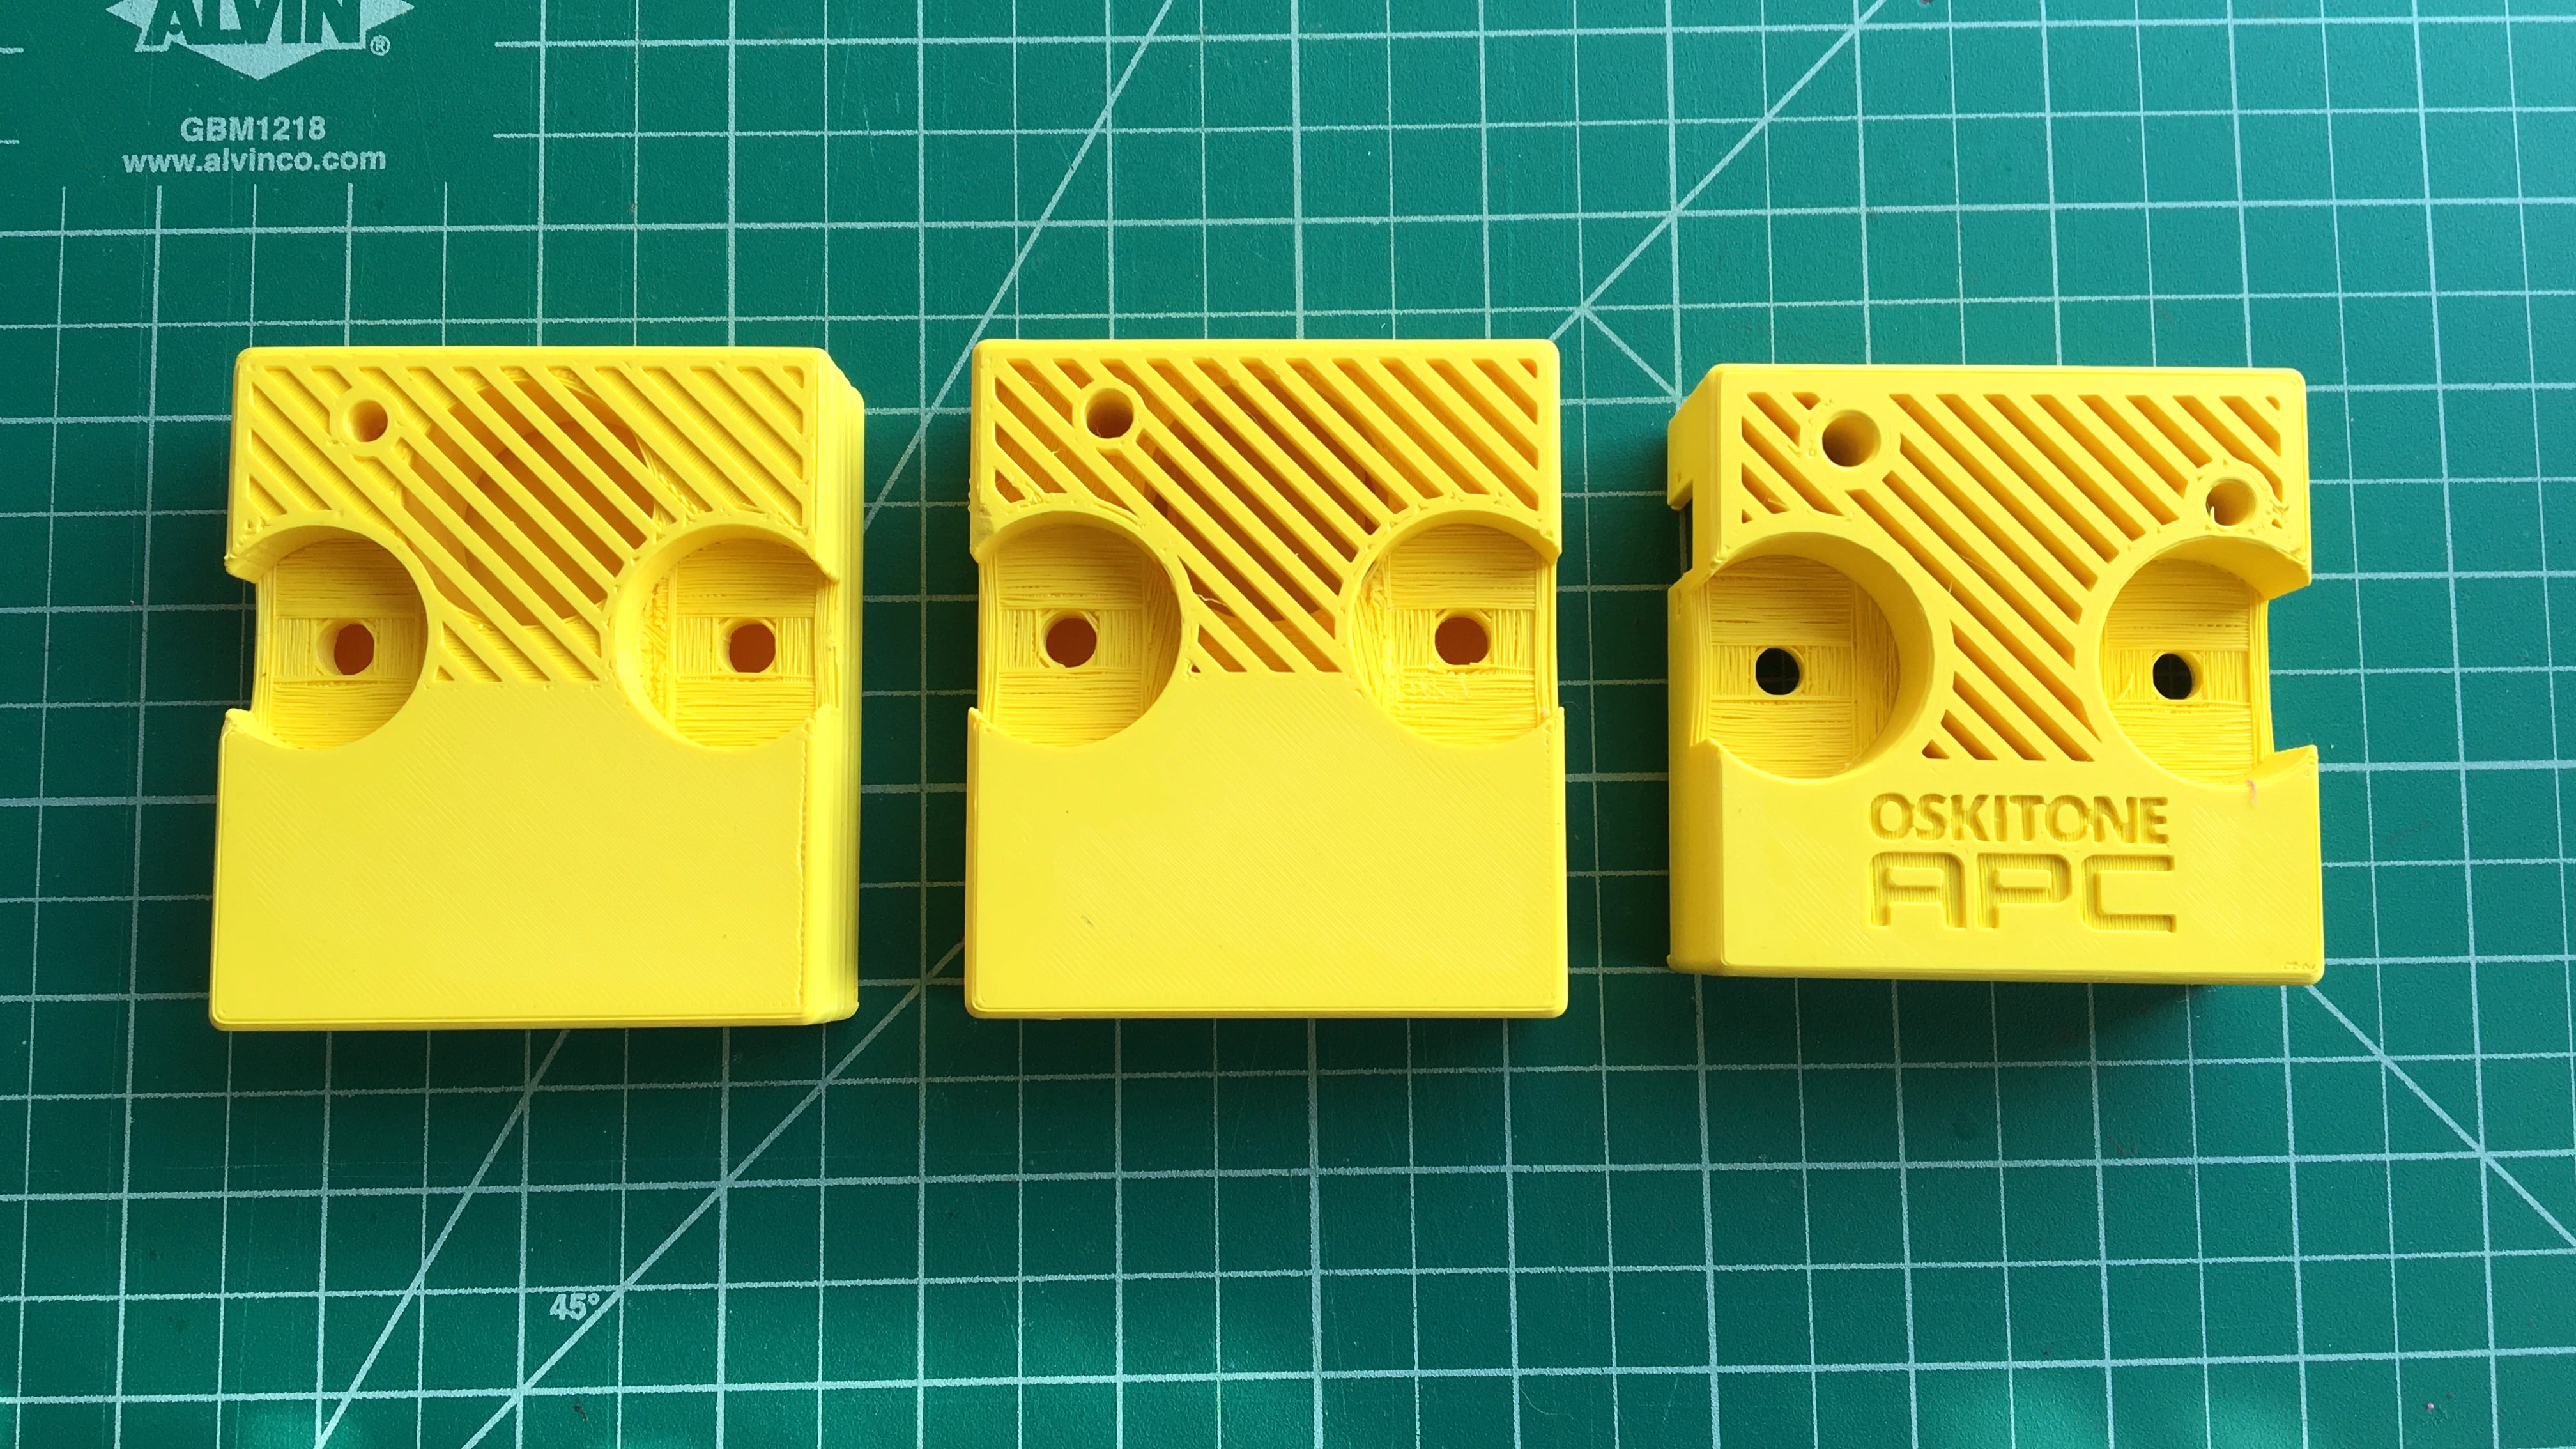
Now. to make room for the speaker and battery, the POLY555's PCB design is shaped like an "L". Flashback to this early version and feign shock at all of the empty space in the top right!
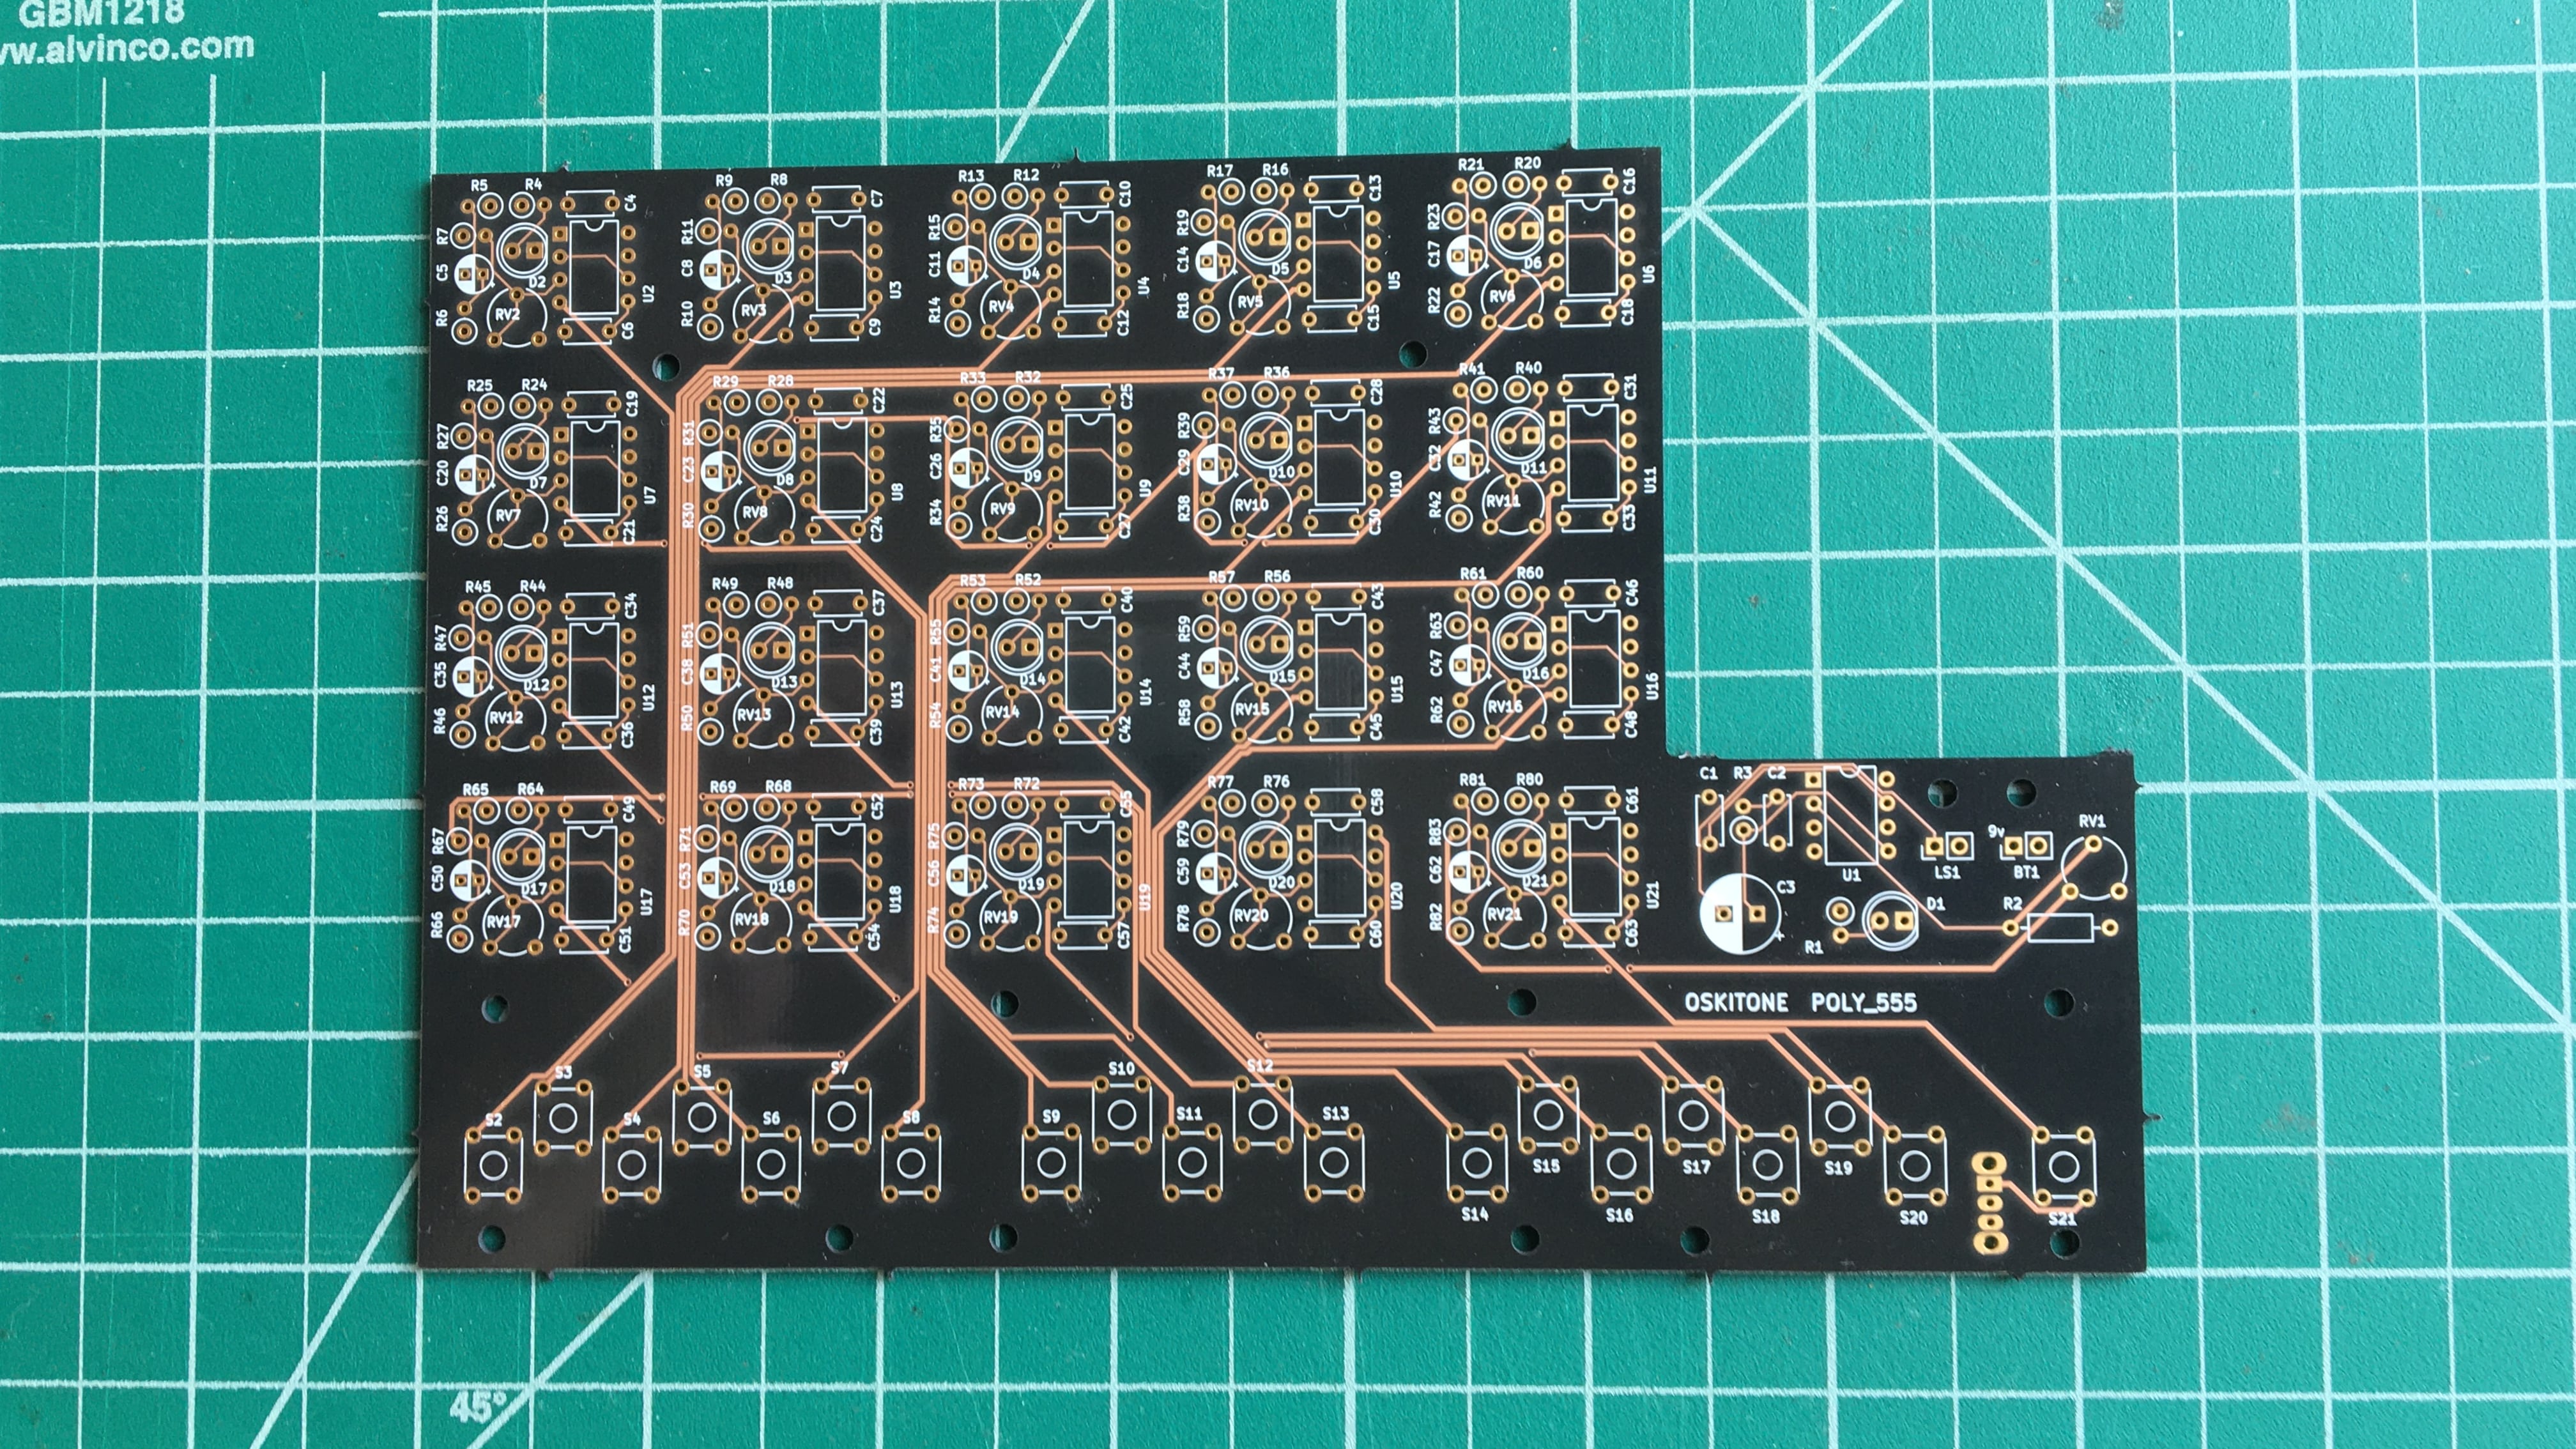
Getting small batches of big PCBs like this made domestically for the prototype phase isn't cheap, and my wallet is sensitive. Leaving that top right corner vacant means I'm literally paying for nothing; the factory drills it out and throws it away.
So what am I to do? I reach for my well worn copy of Timer, OpAmp & Optoelectronic Circuits & Projects, turn to its most dog-eared page, hastily Kicad the circuit, and throw together an untested board design with some jelly bean components I have before sending the design off for fabrication.
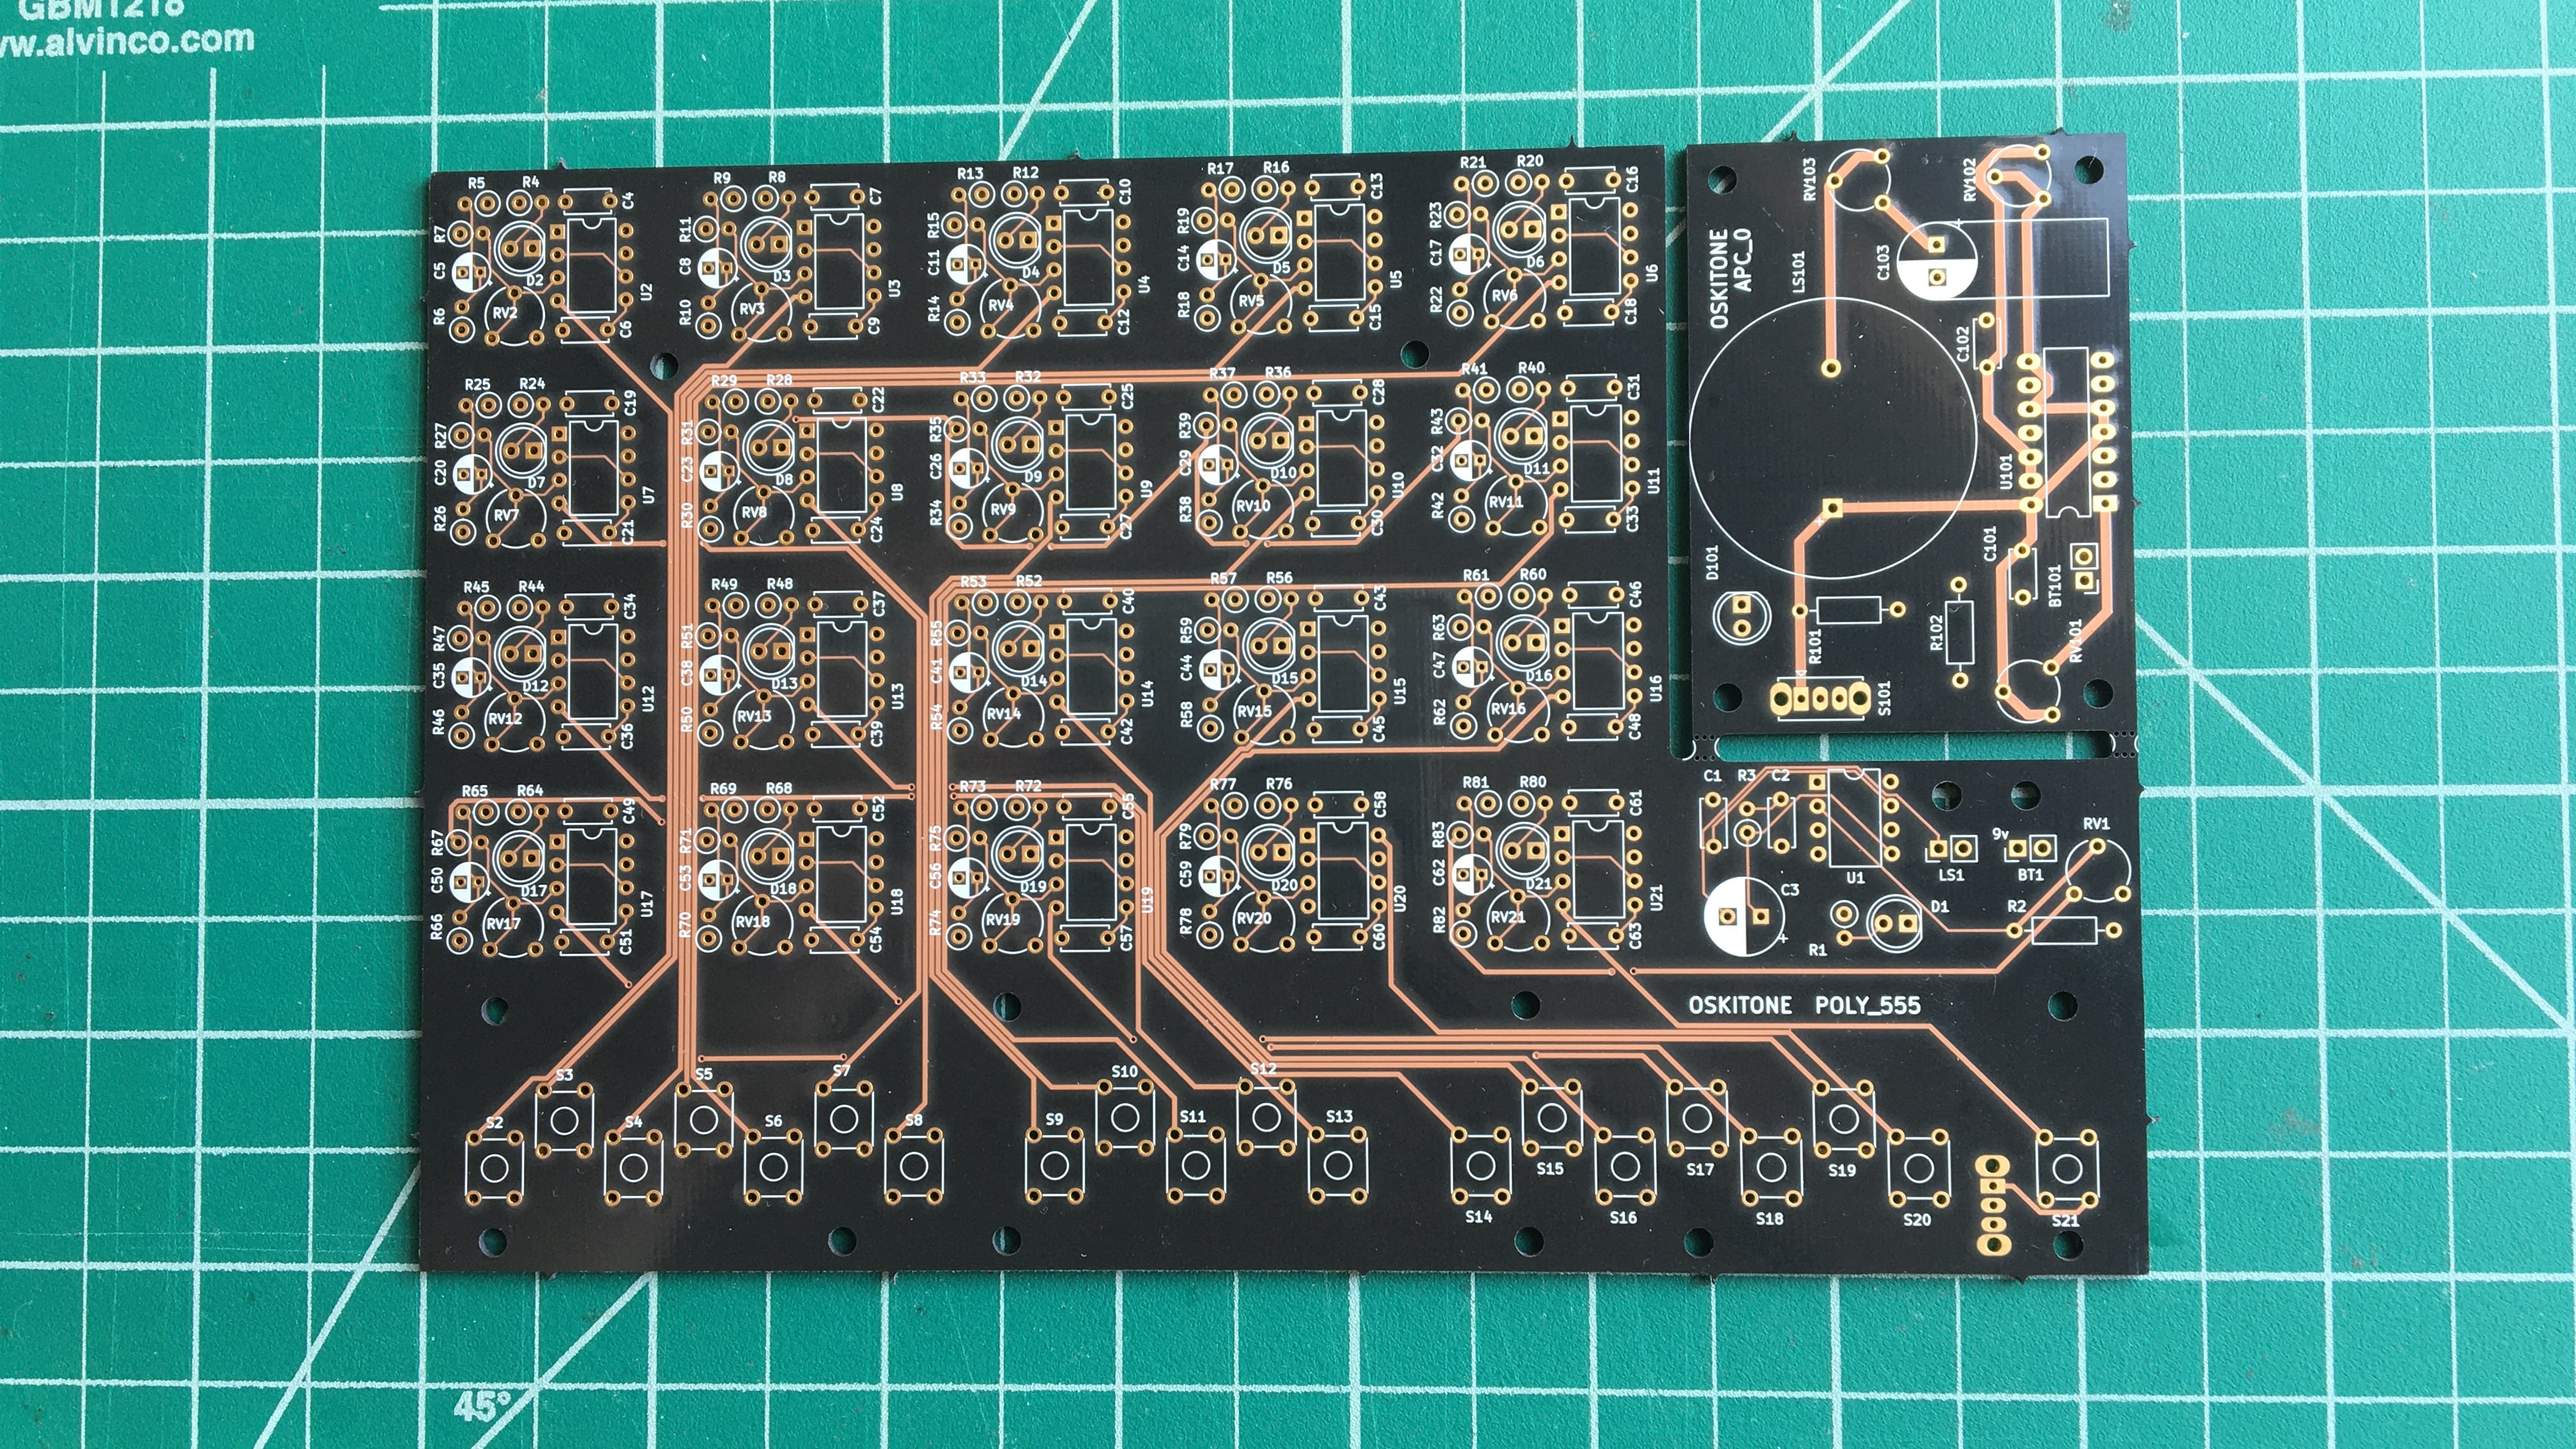
Nice, it (mostly!) worked! Now I'm fully utilizing the area that I'm paying for: the POLY555 "L"s will go to their kits, which I was feverishly trying to bring to market at the time, and the smaller APC corner rectangles will break off and eventually, hopefully be made into something cool.
Fun fact: Connecting multiple board designs into one bigger board is called "panelizing". Here I've done it with little tabs that snap apart when bent, which is fun to do!
Yet another Atari Punk Console
The circuit in question was originally described as a "Sound Synthesizer" or "Stepped Tone Generator" by Forrest M. Mims III in Radio Shack books in the early 1980s and later came to be known as the "Atari Punk Console" (aka APC). People liked it enough that they kept making it, and now it's some kind of classic. For many folks, author included!, an APC is one of their first forays into electronics.
If you google it, you'll find countless varieties of this circuit. It's small enough to fit into any kind of makeshift enclosure, and its simplicity and flexibility make it an ideal subject for modifications.
In case it's not obvious, the market differentiation for the Oskitone APC is its design.
How does it work?
In short, it uses two 555 timers (like what I've used in the POLY555, the OKAY 2, and the original OKAY Synth) but often housed together in one chip called a 556. One timer is an astable oscillator making a square-ish wave; its output feeds into the other 555, wired up as a monostable "one-shot" (a circuit that, when triggered, outputs one pulse of arbitrary length).
Atari Punk Consoles are "played" (term used generously) with two potentiometers. One on the astable controls its frequency, and another on the monostable controls its length.
The schematic for the Oskitone APC is pretty much lifted straight from the original Mims diagram with minor pot value changes, a switch, and an LED for on/off indication.

PCB
The final PCB design looks like this:
The corner holes are for mounting screws, which are a good bet on any PCB but I ended up not using.
Picking the right components
- The little 1k trim potentiometer on the right is for volume. The first version of the PCB (see above) also used it for the playing pots, but I swapped them for much sturdier pots that'll do a better job standing up to aggressive playing.
- The speaker isn't great for bass, but it is self-enclosed and easy to solder because it requires no hookup wire. Tidy! (I also had 100 of them from overzealous parts sourcing, just waiting for a project...)
- The 5mm LED, toggle switch, 1k trimpot, and battery snap are all used in the POLY555. The fewer unique components needed, the more economical to make -- sometimes the best things to use are the things you already have!
Product design
Believe it or not, because of the APC-PCB-as-byproduct-of-POLY555 thing, the rest of the APC was designed months later. I probably had 100 "final" APC PCBs on hand before sitting down to really think about what it would look like as a finished object.
Working around that fixed PCB constraint was an interesting "freedom in constraint" design challenge. I'm sure, if given the opportunity for revision, I'd nudge things around and delay the release, but would it have been worth it? Who knows?!
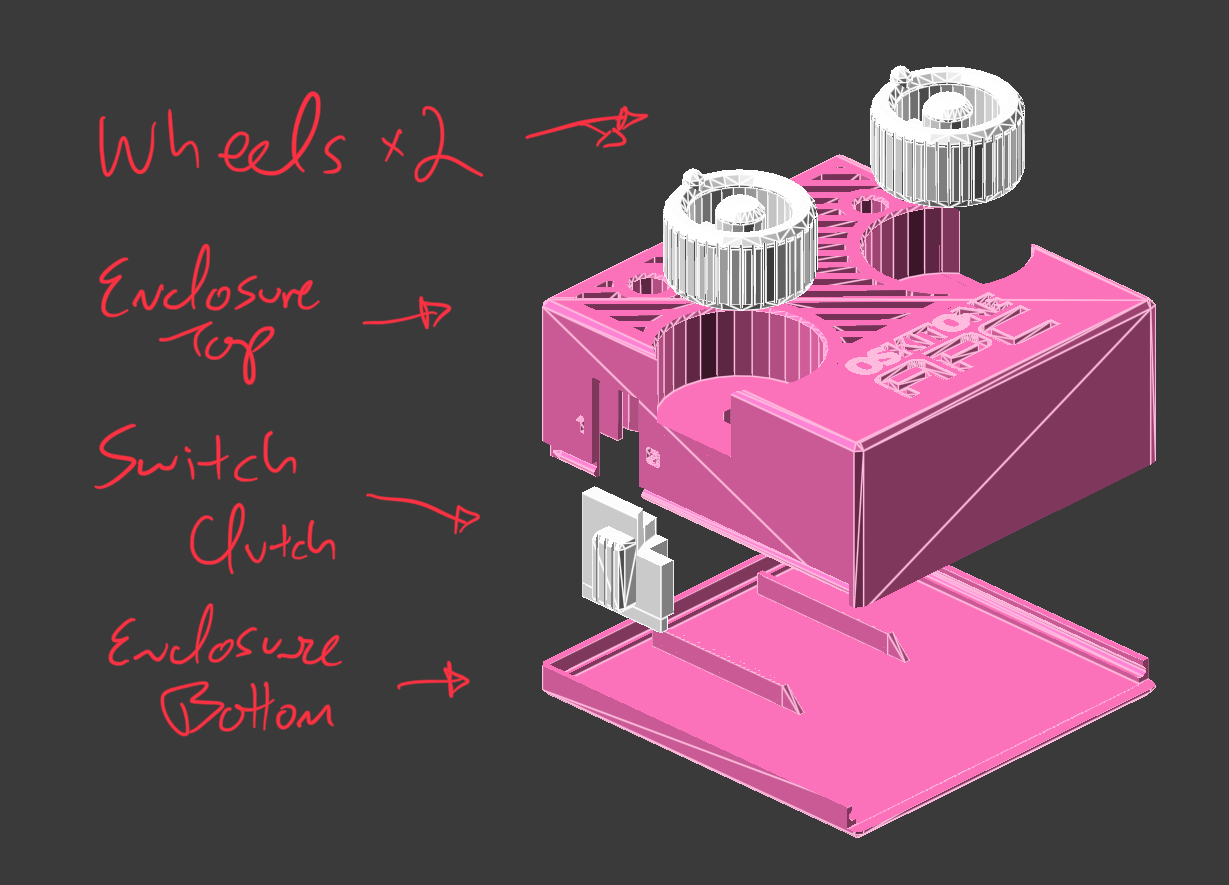
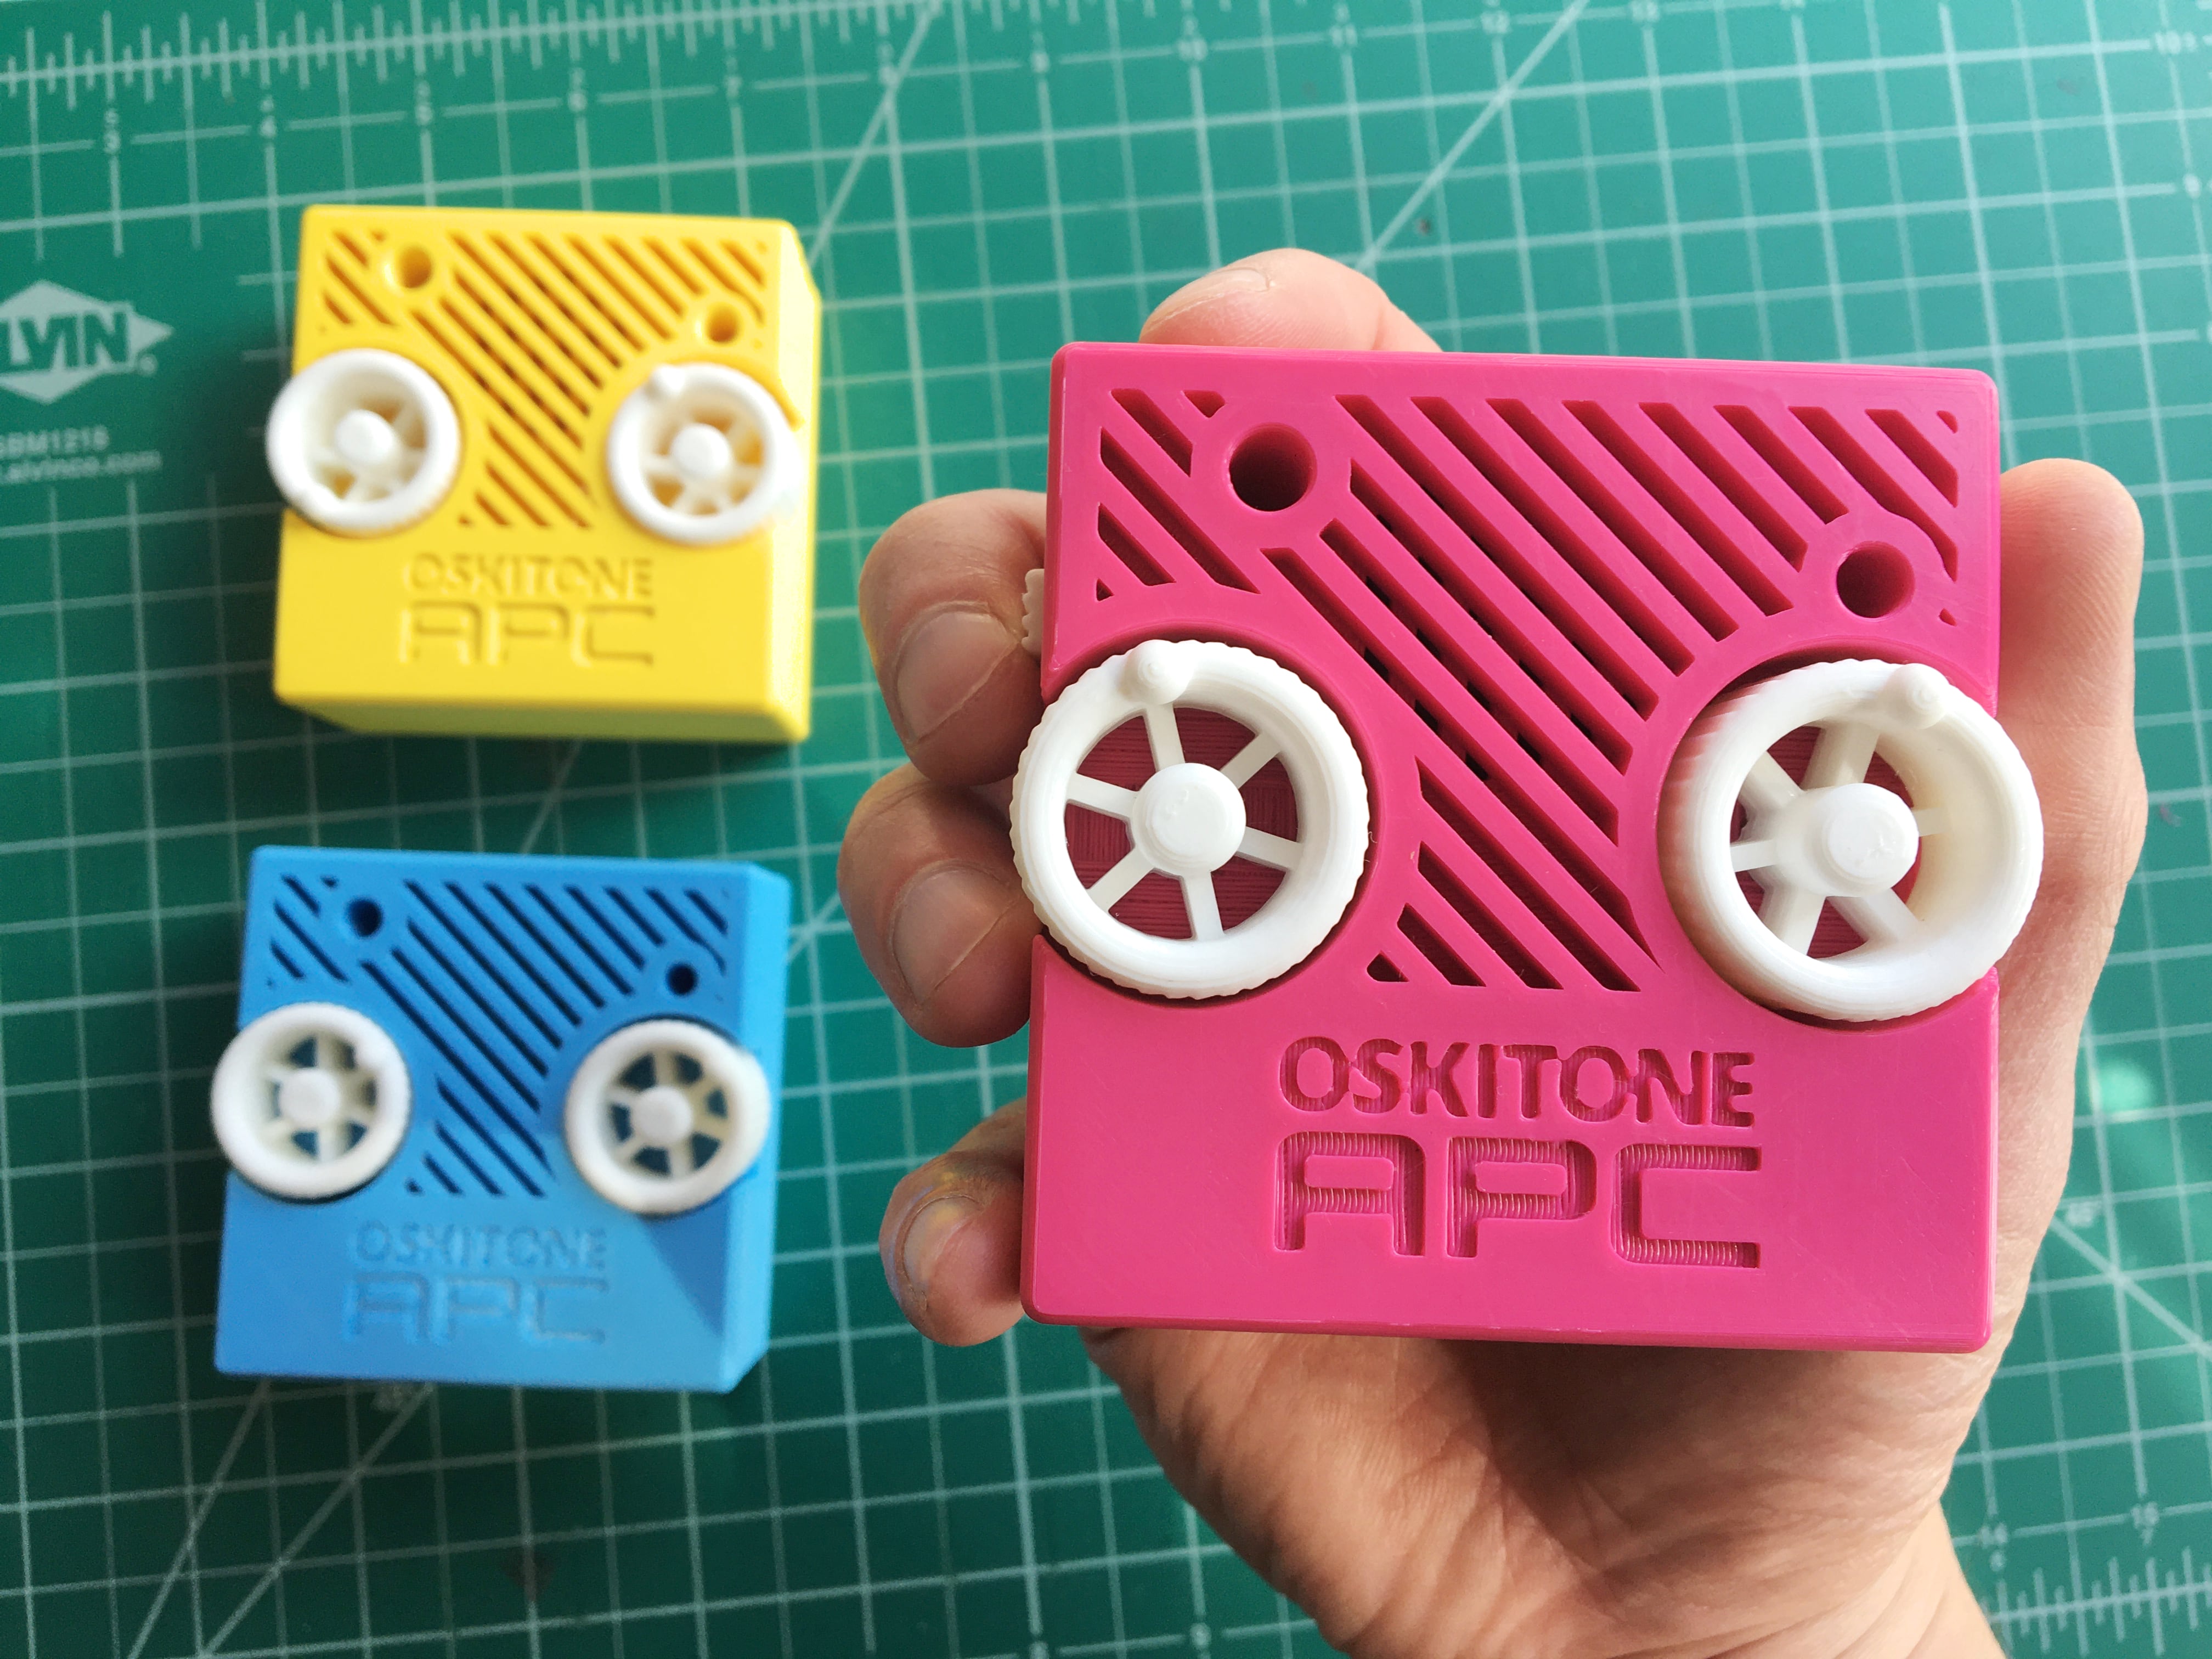
Wheel knobs
The APC's knobs are more like little K'Nex wheels than traditional potentiometer knobs. Without the enclosure, here's how they fit onto the pots:

And with the enclosure, with a closeup of the switch clutch:
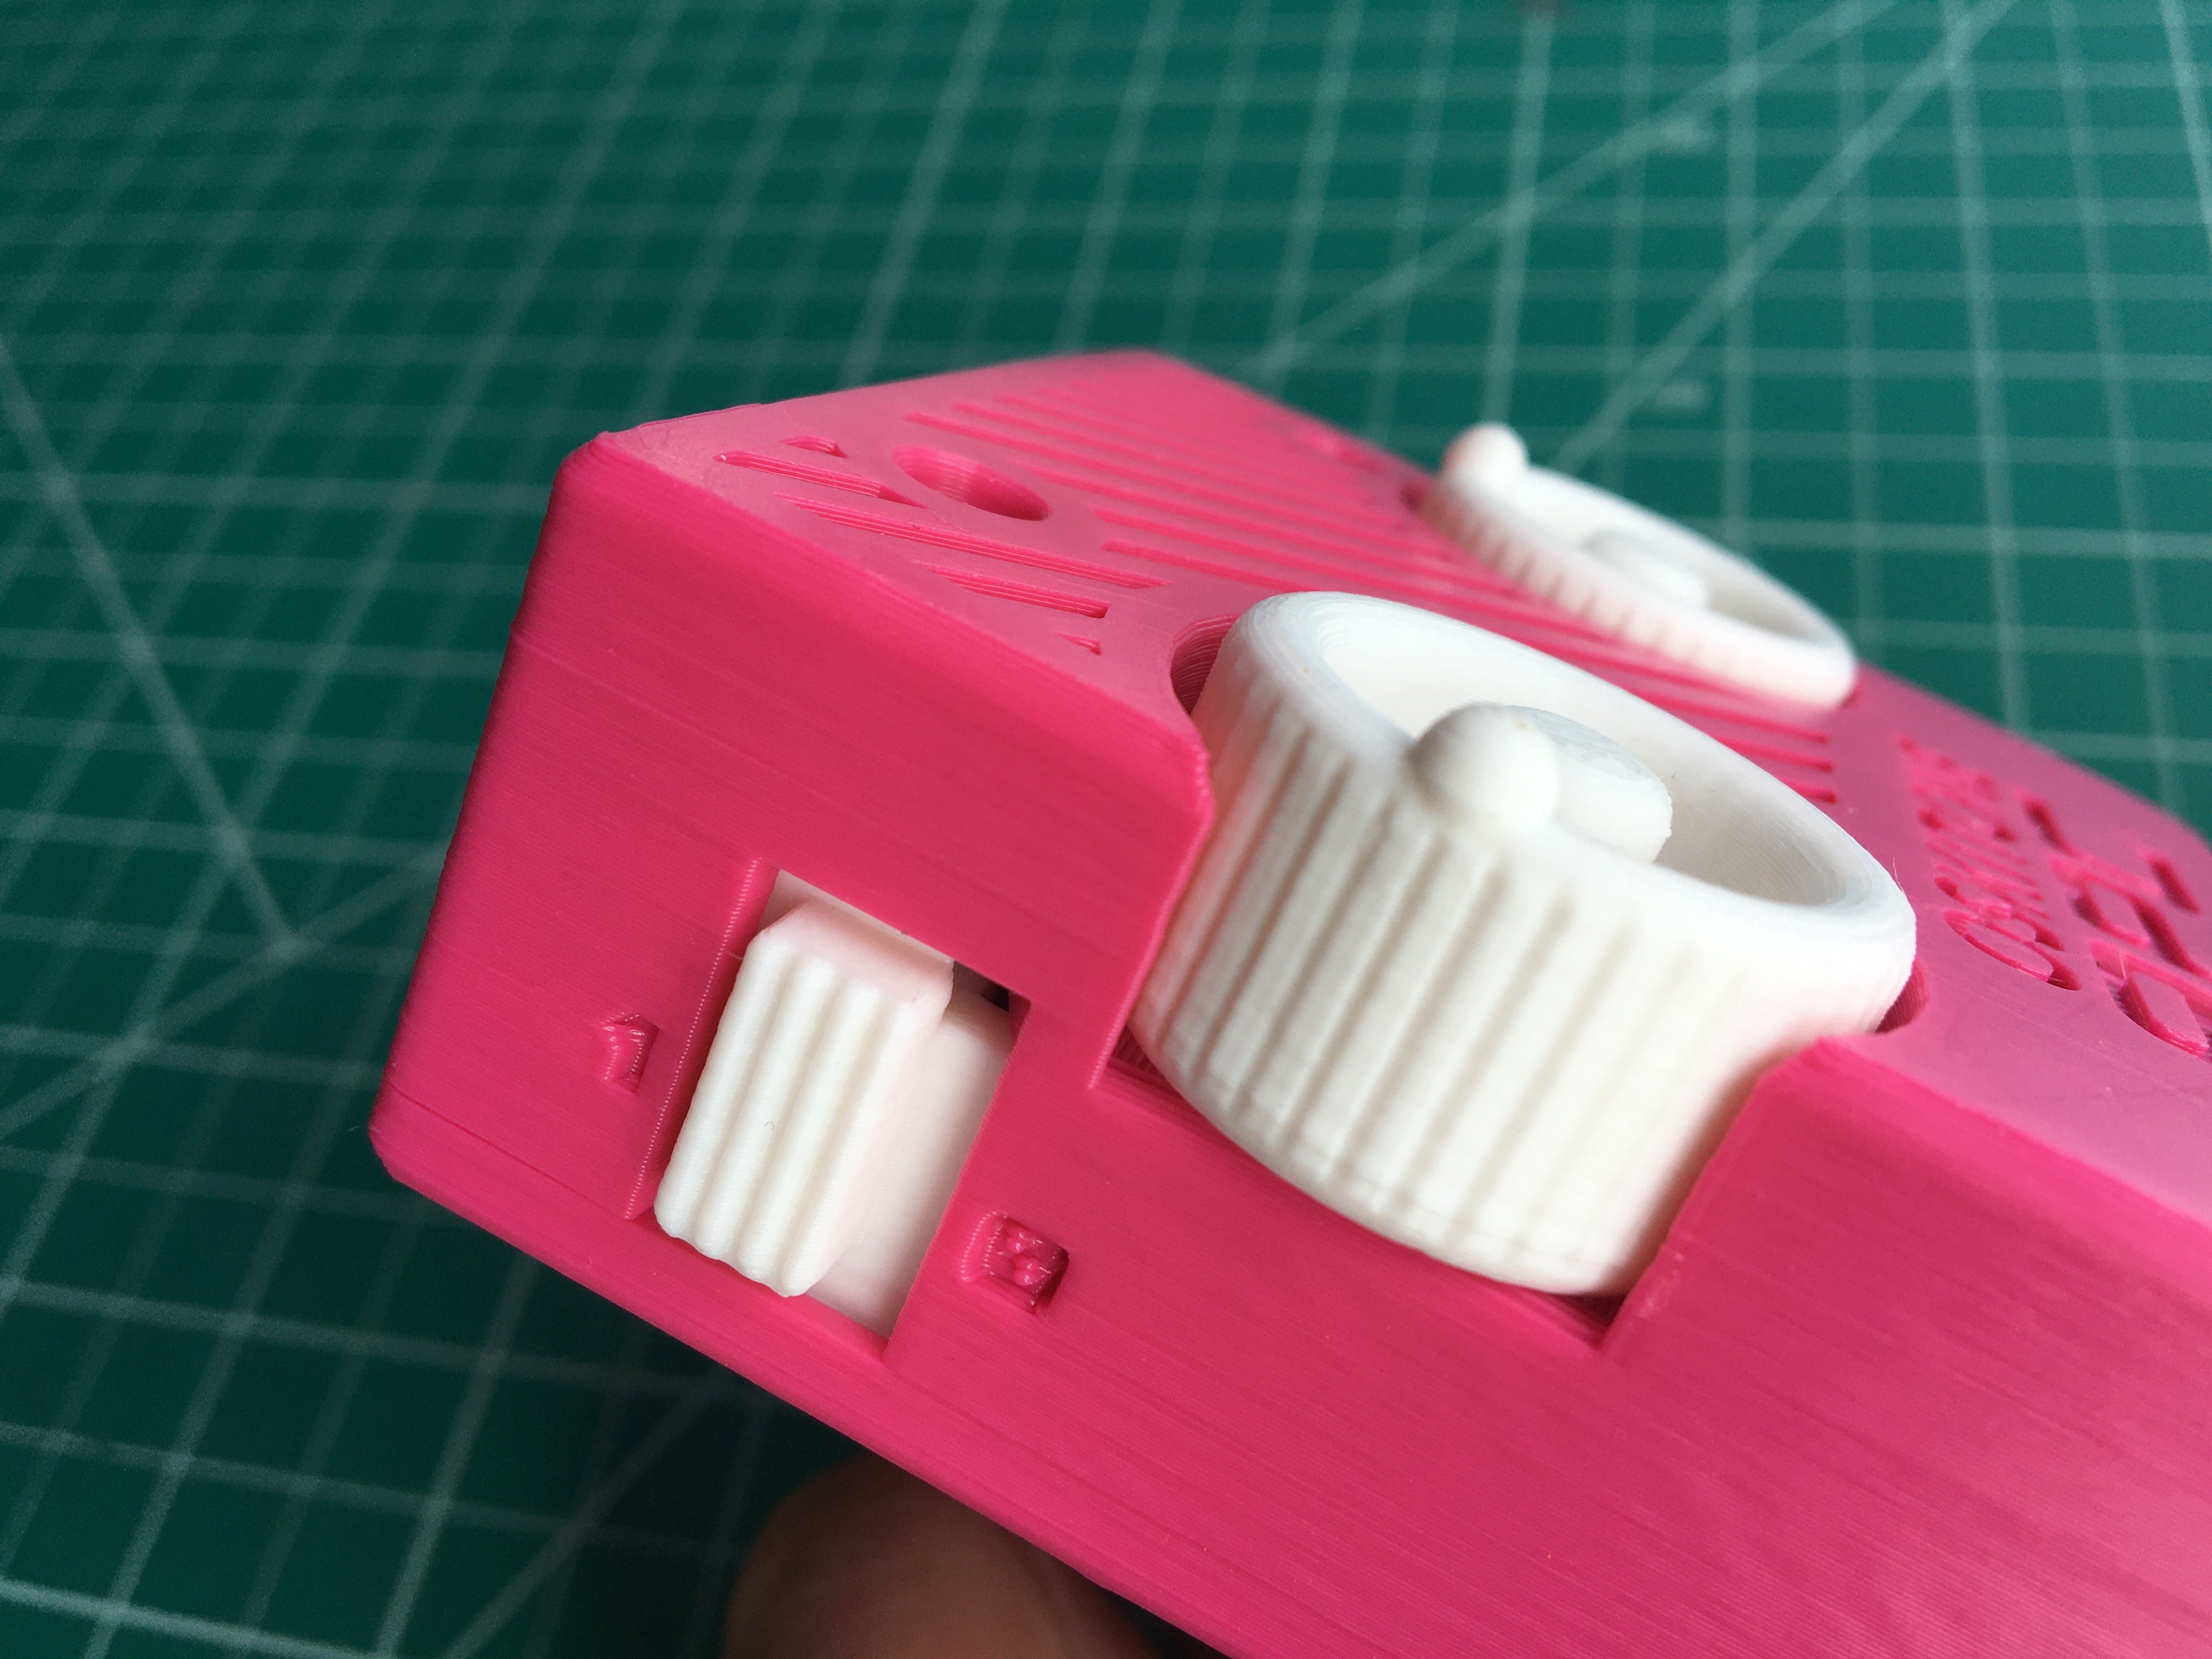
- On top, raised spheres act as combination position markers and brodie knobs, so the user can manipulate each pot using just their thumb. With the other fingers naturally wrapping to the back of the APC, it feels a lot like holding a joystick game controller.
- The wheels are exposed out of the enclosure's sides too, so you can roll it against your palms as another way to play. The exact amount of exposure and the friction ridges match the switch clutch.
- The pots I'm shipping with the kits have knurled shafts that are locked onto with little shims in the wheel's inner cavity, as described in my old blog post about designing custom potentiometer knobs. There are no heat-set inserts to apply or screws to tighten.
Design for Manufacturing: the pot cavities are generously chamfered for easier assembly and to make up for "elephant's foot" during printing, where the plastic expands on the first few layers due to weight and heat and can negatively impact fit tolerances.
Switch clutch
The APC has a plain, stock switch to toggle its power. Instead of letting it poke out through the enclosure's top, it's abstracted by a piece I'm calling a "switch clutch" that sits next to the switch, clutches its actuator, and is activated through the enclosure's side.
Here it is in detail without the enclosure:
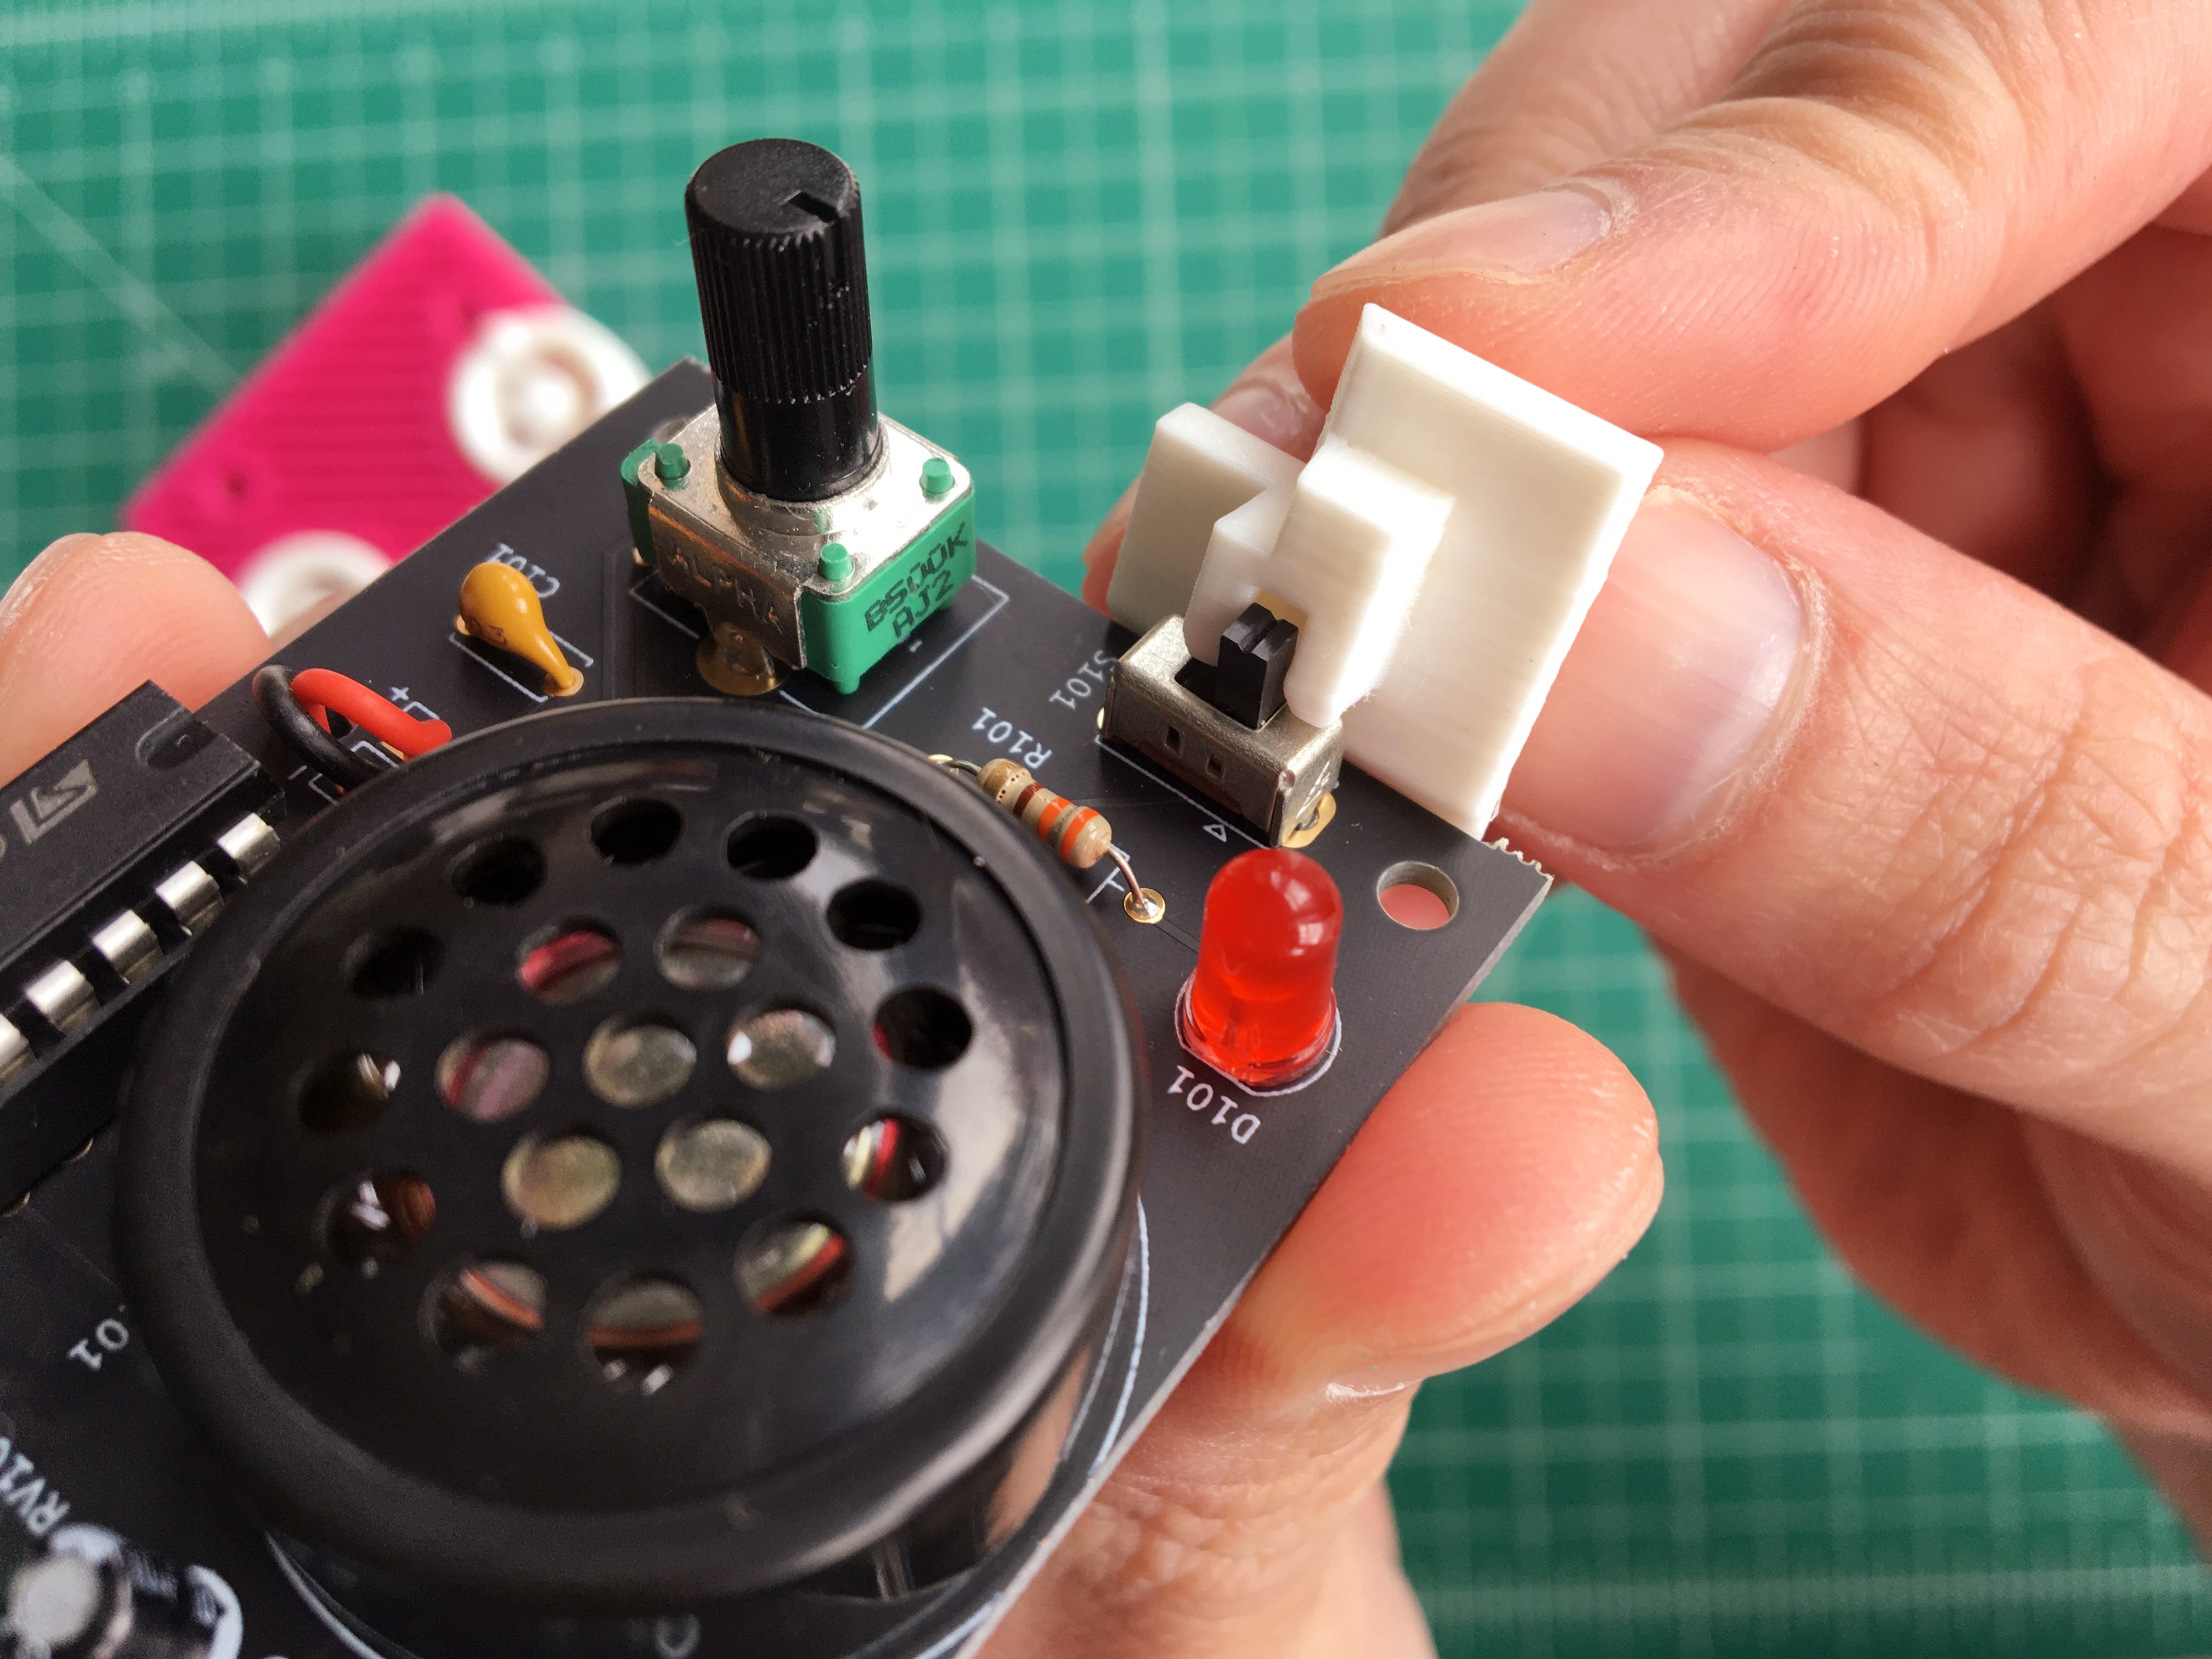
(That chipped corner is Artifact 1 of the PCB design. When the switch is in the off position, the clutch juts into the inner wall of the wheel's cavity, and that little cavity prevents obstruction to make it all work.)
A piece like this seems superfluous, but it frees up the enclosure top to show off the speaker grill, makes it much easier for the user to toggle the switch, and ties it together with the wheels. I like it!
Design for Manufacturing: Two narrow walls with a one-layer-height gap of air before contact support the piece while 3D-printing and break off clean when done.
Enclosure
The enclosure's outer dimensions are derived from the PCB, its components, and battery, including the battery's orientation. Here are some early iterations with the battery rotated a different way and shallower speaker grills:
Design for Manufacturing: See the sort of quilty aperture pattern in those wheel well cavities? Those are me trying to perfect floating holes that can print without supports. As evidenced by the inconsistencies you might also see in them, they were tricky to get right because of 1) the required wheel diameter to have them expose out the enclosure's sides and 2) the super tight clearance between the speaker and internal wheel well walls. That difficulty is Artifact 2 of designing the PCB in isolation before the rest of the APC.
I really like the final design and its asymmetrical cocked eyebrows. It's a weird, darling little thing with a lot of personality.

- The enclosure's top and bottom slide together with tongue and groove joints, which were originally written for the POLY555 before being abandoned for not being strong enough.
- The PCB nestles perfectly into the enclosure top, and rails on the enclosure bottom hold it into place. Again, no screws needed.
- The pot wheels sit in two, deep wells that extend over the sides for additional wheel access.
- A false grill covers 2/3 of the enclosure's top, entirely for aesthetics (the self-enclosed speaker doesn't need it), and wraps around the wheels. It obscures the speaker below by being extra deep and having two layers of grills at different angles. (Look close at the pic above and see if you can see the speaker cavity. Then compare to the yellow prototypes above. Huge difference!)
- The grill also wraps around the power LED cavity and an access hole for the volume potentiometer. (I'd considered using the POLY555's thumbwheel but decided it wasn't worth it.)
- The non-grill space on the top is engraved with make and model text, and the bottom has a big "OSKITONE" vanity wordmark, similar to previous Oskitone synths.
- Engravings on the sides mark on/off switch positions and a "V" for "Volume" access.

Get or Make Your Own
Lots of folks have asked me to make something for younger makers or those new to electronics. While I'm sure an annoying noise toy isn't, uh, exactly what they wanted, I'm hopeful this gets at least a little bit closer.
It takes less than thirty minutes to put together:
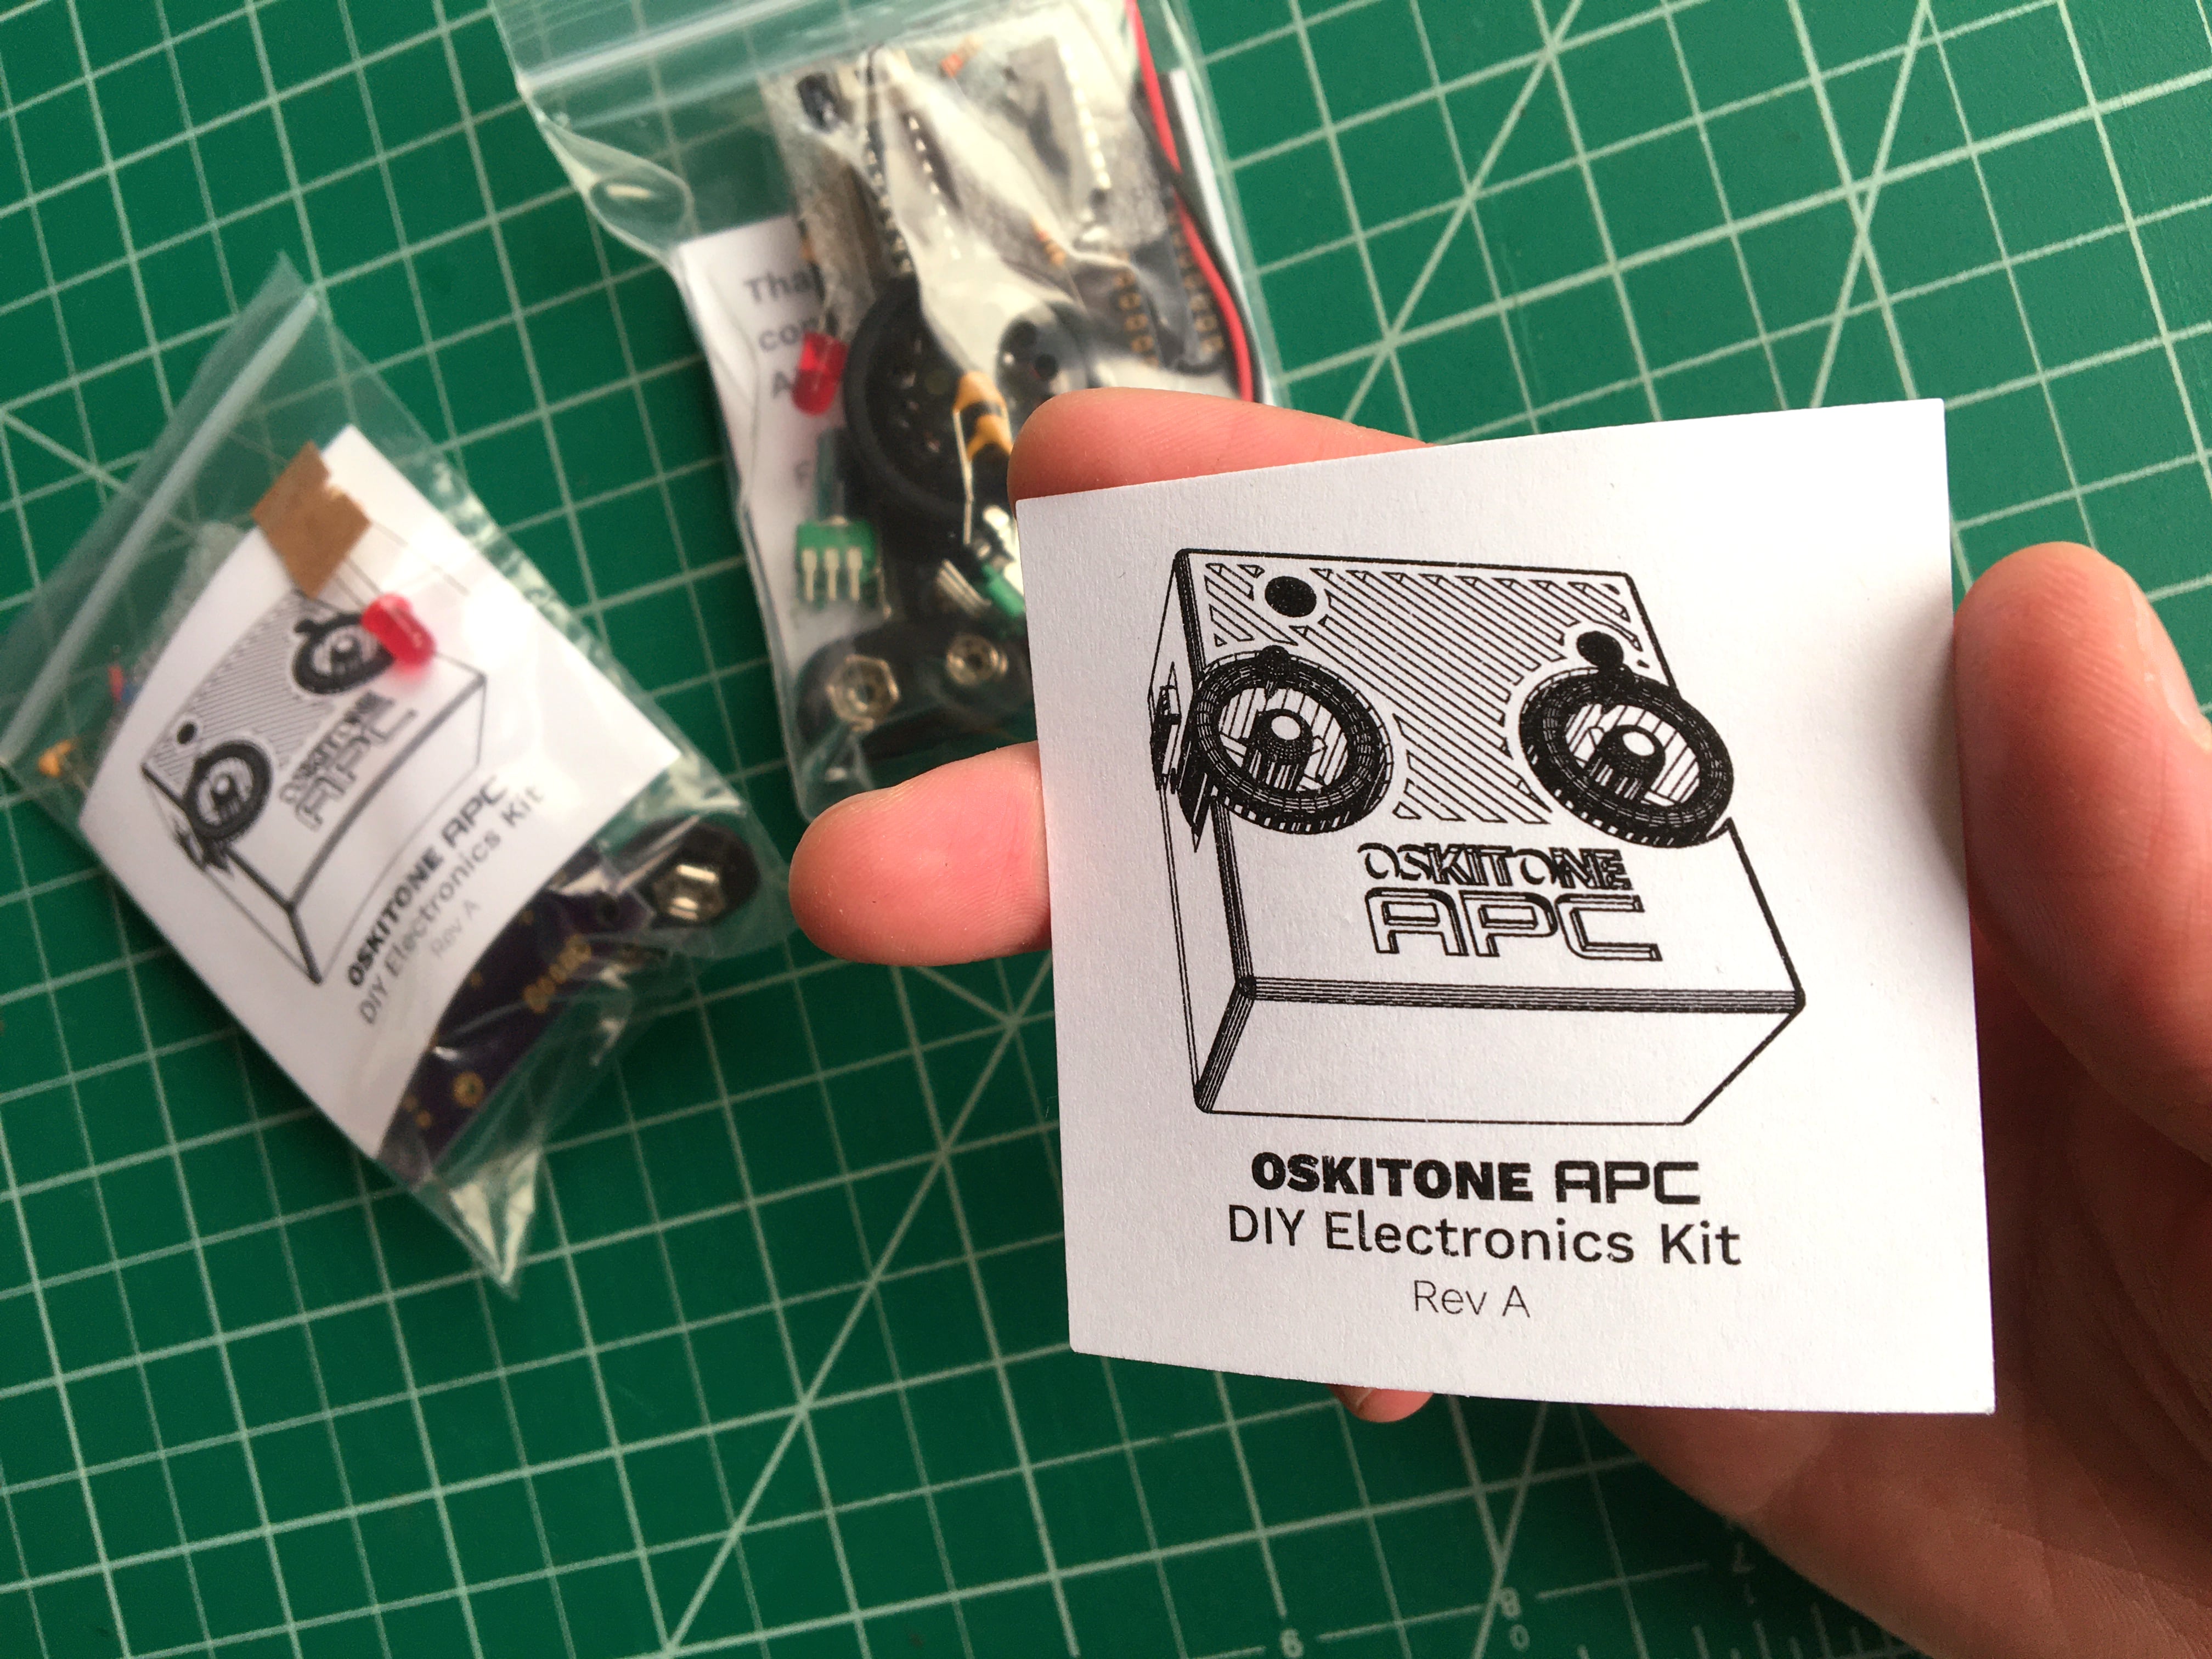
The Oskitone APC is available fully assembled or as a DIY electronics kit. Like the POLY555 before it, it's fully Open-Source, from the PCB to the OpenSCAD code for the 3D models, to the documentation.
What's Next?
Hopefully nothing to do with 555 timers. I mean it this time!
Appendices
Appendix A: Making STLs in the command line, in parallel
In the OpenSCAD code, there's one top-level apc module that encapsulates its children. Toggling different parts of the APC is done with arguments:
apc(
  (show_enclosure_top = true),
  (show_enclosure_bottom = true),
  (show_pcb = true),
  (show_wheels = true),
  (show_switch_clutch = true),
  (show_battery = true),
  (show_dfm = true)
);
That works fine but is super laborious if you want to export an STL of each part individually, especially when you're making a lot of iterations during development. The APC's code borrows again from the POLY555 with its make_stls.sh shell script to automate that.
Here's how it works:
- Using the OpenSCAD CLI
-Dflag to override variables for eachshow_...argument, iterates through a list of the model parts, setting each flag to false except for the part in question and exporting it as an STL. - The STL's filename is prefixed with the timestamp and hash of the last relevant git commit. This way, there's never any confusion about which exact version of the code the STL is from, and the timestamp ensures they're sorted. (I think we're all familiar with terrible filenames like
xyz-final,xyz-final2,xyz-for_real_this_time_please. This is a million times better than that.) - The STLs also render out in parallel to save time and in binary format to save space.
- When all are done, it zips them up into one file. Convenient!
It's also got a lot of neat things useful for development, like the ability to query for a subset of models to export, customizable folders and prefixes (as shown above), etc.
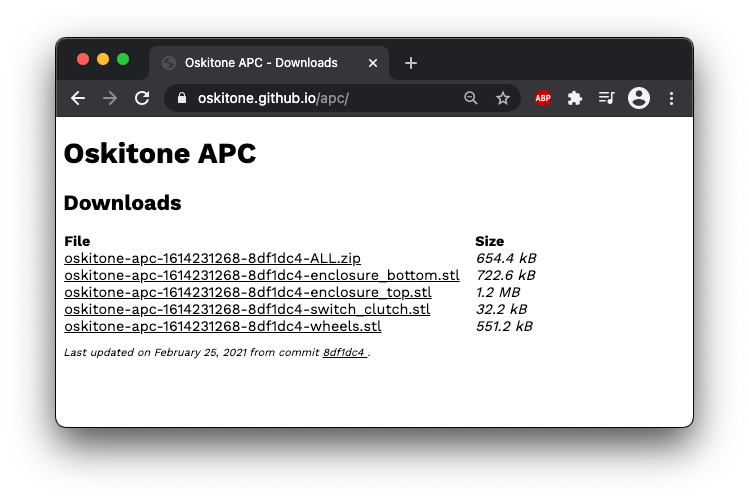
Appendix B: Self-hosting STLs
Update (Aug 2024): Abandoned. It was a good idea but I wanted to use the GitHub Pages spot for documentation. Changed in commit ce413f2974.
I'm trying a new thing with the APC where I'm hosting the STL files of the 3D models myself instead of using Thingiverse like I'd normally do. To do that, there's also a downloads/deploy.sh script that:
- Optionally runs
make_stls.shto make new STL files and zip - Runs a Python script that generates a utilitarian "Downloads" web page for them using a Mustache template.
- Deploys to GitHub Pages for hosting by committing and pushing to a special
gh-pagesbranch. - After a couple minutes, oskitone.github.io/apc is automatically updated with all the latest files for download.
What's great is that because the binary STL files are 75% smaller than their ASCII counterparts and the ZIP collects them and compresses even more, the final download sizes aren't much different from a typical blog post's images (haha woops sry) and should be well within the bandwidth limits.
What's also great is that I can deploy new 3D models with one command, using code I wrote that works as expected and is pleasant for me to use.
Appendix C: Parametric wheel knobs
I liked writing the wheel module, and it's adaptable to a lot more than how it's currently being used for the APC.
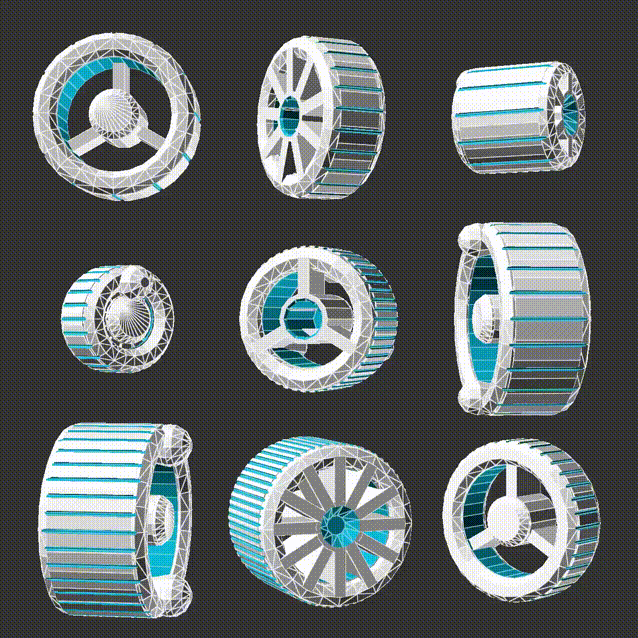
In addition to all the different dimensions and grips and brodie knob counts, eagle-eyed viewers may also see the little ridge inside the pot cavity from when I was thinking about using D-shaft pots. Minutiae!